IMPORTANT We strongly advise to read Introduction to Apache Camel prior to reading this page.
Integration Flow Definition
Domain-Specific language
Unit4 Integration Kit uses a Domain-Specific language for the definition of Integration Flows. Camel’s domain-specific language (DSL) is a major contribution to the integration space. A few other integration frameworks currently feature a DSL (and some allow you to use XML to describe routing rules), but unlike Camel their DSLs are based on custom languages. Camel is unique because it offers multiple DSLs in regular programming languages such as Java, Scala, Groovy, and it also allows routing rules to be specified in XML.
The purpose of the DSL is to allow the developer to focus on the integration problem rather than on the tool—the programming language. Although Camel is written mostly in Java, it does support mixing multiple programming languages. Each language has its own strengths, and you may want to use different languages for different tasks. You have the freedom to build a solution your own way with as few constraints as possible. Here are some examples of the DSL using different languages and staying functionally equivalent:
- Java DSL
from("file:data/inbox?delay=5000").to("jms:queue:order");
- Spring DSL (XML)
xml
  <route>
    <from uri="file:data/inbox?delay=5000"/>
    <to uri="jms:queue:order"/>
  </route>
In Unit4 Integration Kit Spring DSL (XML) is implemented. You can configure a CamelContext inside any spring.xml using the CamelContextFactoryBean. This will automatically start the CamelContext along with any referenced Routes along any referenced Component and Endpoint instances.
- Adding Camel schema
- Configure Routes using Spring XML
You need to use the namespace http://camel.apache.org/schema/spring with the schema location http://camel.apache.org/schema/spring/camel-spring.xsd. You also need to add Camel to the schemaLocation declaration: http://camel.apache.org/schema/spring http://camel.apache.org/schema/spring/camel-spring.xsd, so the declaration normally is:
<beans xmlns="http://www.springframework.org/schema/beans"
       xmlns:xsi="http://www.w3.org/2001/XMLSchema-instance"
       xmlns:camel="http://camel.apache.org/schema/spring"
       xsi:schemaLocation="http://www.springframework.org/schema/beans
       http://www.springframework.org/schema/beans/spring-beans.xsd
       http://camel.apache.org/schema/spring
       http://camel.apache.org/schema/spring/camel-spring.xsd">
Integration Flow XML
First, we’ll create the <integrationFlow> root element. The integrationFlow element will always contain a subelement <routes> in which we will define our Camel routes. The <routes> subelement contains the declaration of namespaces just mentioned before. Next to the <routes> subelement the <integrationFlow> element optoinally can contain two other subelements, namely <errorHandlers> and <beans>. Notice how the <routes> element contains all required Apache Camel and Spring namespaces and schema locations as mentioned above:
<?xml version="1.0" encoding="UTF-8"?>
<integrationFlow xmlns="http://u4ik.unit4.com/gmp/integrationFlow">
  <routes xmlns="http://camel.apache.org/schema/spring"
          xmlns:xsi="http://www.w3.org/2001/XMLSchema-instance"
          xsi:schemaLocation="http://www.springframework.org/schema/beans
          http://www.springframework.org/schema/beans/spring-beans.xsd
          http://camel.apache.org/schema/spring
          http://camel.apache.org/schema/spring/camel-spring.xsd">

    <!-- Add routes here -->
    <route id="main" >
      ...
    </route>
    <route id="sub">
      ...
    </route>

  </routes>
  <errorHandlers>
    <errorHandler id="eh" type="DefaultErrorHandler" xmlns="http://camel.apache.org/schema/spring">
      ...
    </errorHandler>
  </errorHandlers>

</integrationFlow>
Camel utilizes Spring extension mechanisms to provide custom XML syntax for Camel concepts within Spring XML. At runtime, based on the content of the <routes> element, a CamelContext will be loaded in Spring. This will automatically start a SpringCamelContext. The <camelContext> element represents (unsurprisingly) the Camel context, which can be compared to a Spring application context. CamelContext is a container for Components, Routes etc. Notice that you had to include the http://camel.apache.org/schema/spring/camel-spring.xsd XML schema definition in the XML file—this is needed to import the custom XML elements.
Creating a route
The snippet above on itself isn’t going to do much for you. You need to tell Camel what route(s) to use. You should take a moment to look at the Enterprise Integration Patterns - the base pattern catalog for integration scenarios. Once you have read about the Enterprise Integration Patterns, you might want to try out some examples.
Within the route element, you specify the route using elements with names similar to ones used inside the Java DSL RouteBuilder. An example route looks like this:
<route>
<from uri="ftp://rider.com/orders?username=rider&password=secret"/>
<to uri="jms:incomingOrders"/>
</route>
Within the route element, you specify the route by using elements with names similar to ones used inside the Java DSL RouteBuilder. Notice that we had to modify the FTP endpoint URI to ensure that it’s valid XML. The ampersand character (&) used to define extra URI options is a reserved character in XML, so you have to escape it by using &.
For longer endpoint URIs, it’s often easier to read them if you break them up over several lines. See the previous route with the endpoint URI options broken into separate lines:
<endpoint id="ridersFtp" uri="ftp://rider.com/orders?
username=rider&
password=secret"/>
<route>
<from ref="ridersFtp"/>
<to uri="jms:incomingOrders"/>
</route>
Using multiple routes
You can also create multiple routes with the XML DSL. To do this, add a route element within the camelContext element. For example, move the DownloadLogger processor into a second route, after the order gets sent to the incomingOrders queue:
<route>
<from uri="ftp://rider.com/orders?username=rider&password=secret"/>
<to uri="jms:incomingOrders"/>
</route>
<route>
<from uri="jms:incomingOrders"/>
<process ref="downloadLogger"/>
</route>
Now you’re consuming the message from the incomingOrders queue in the second route, so the downloaded message will be printed after the order is sent via the queue.
Using configuration property placeholders
For reuse the same Integration Flow between different tenants you can use placeholders to mark configuration properties as a tenant-specific. E.g. Rather than having hardcoded endpoint URIs, you can use tenant specific configuration property (in this case URIs, ftpUsername, password) to replace the dynamic parts.
<route>
<from uri="{{ftpAddress}}?username={{ftpUsername}}&password={{ftpPwd}}"/>
<to uri="jms:incomingOrders"/>
</route>
<route>
<from uri="file:src/data?noop=true"/>
<to uri="jms:{{myDest}}" />
</route>
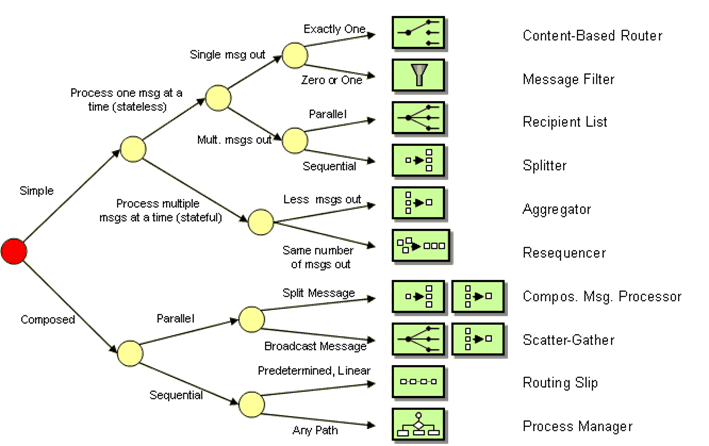
The right router for the right purpose
How can we make it easy to find the right pattern for the right purpose? The following decision chart helps you find the right pattern for the right purpose by matter of simple yes/no decisions. For example, if you are looking for a simple routing pattern that consumes one message at a time but publishes multiple messages in sequential order, you should use a Splitter. The diagram also helps illustrate how closely the individual patterns are related. For example, a Routing Slip and a Process Manager solve similar problems while a Message Filter does something rather different:
