
Flows
Both OAuth 2.0 and OpenID Connect have defined a few authentication flows for different kind of scenarios and client applications. OpenID Connect defines three types of flows and all of them are supported in Unit4 Identity Services:
- Authorization code flow
- Implicit flow
- Hybrid flow
In addition, Unit4 Identity Services (U4IDS) also supports two more flows defined by OAuth 2.0:
- Client credentials flow
- User impersonation custom flow for downstream delegated authentication
There is also an addition to the Authorization code flow called Proof key for code exchange (PKCE, pronounced Pixy)
Which flow to use?
When choosing the authentication flow to use, it is important to understand:
- what client type, public client or confidential client you have
- if human interaction is involved
- if any downstream chained authentication is involved
U4IDS supports all these flows but we recommend using client credentials for machine to machine communication and Auth Code with PKCE for all user centric scenarios.
- No human involved flows:
- Client credential flow: For confidential clients that do not require a human to be directly involved, client credentials flow can be used. This flow is suitable for machine-to-machine authentication, for example for use in a scheduled job which performs maintenance tasks over an API. Another example would be a piece of software making requests to an API that does not require user permission.
- Human involved flows:
- Authorization code flow: The Authorization code flow is intended for clients that can securely maintain a client secret between themselves and the identity provider. This flow is suitable for native applications and server-side rendered clients, such as Web APIs and native mobile applications. If you combine it with Proof key for code exchange or PKCE (pronounced pixy) it is the recommended code flow for all human involved flows.
- Implicit flow: Implicit flow is intended for clients that cannot maintain secret public clients. This flow is suitable for client-side rendered clients, such as browser-based JavaScript clients.
- Hybrid flow: The hybrid flow is intended for clients that can securely maintain a client secret between themselves and the Identity provider. This flow is suitable for native applications and server-side rendered clients, such as Web APIs and native mobile applications.
- User impersonation flow:
- User impersonation custom flow: custom flows are another type or group of flows that are used when the scenarios require special treatments that none of the standard flows can provide. For OAuth 2.0, it is rather called custom grant type instead of flow. For more information about custom grant type, read on here. In this document, only the "user impersonation" grant is discussed as one of the implemented grant type of U4IDS. Choose this flow if somewhere downstream you need one API to call another API on behalf of the user. This scenario involves a normal client, and at least two APIs where one needs to call another at some point.
Note
The resource owner password grant flow (defined by OAuth 2.0) is not supported by U4IDS.
The table below provides guidance on which flow to choose in particular contexts.
| Property | Implicit flow | Authorization code flow | Hybrid flow | Client credential flow |
|---|---|---|---|---|
| Client can be authenticated | No | Yes | Yes | Yes |
| Suitable for confidential clients | Yes | Yes | Yes | Yes |
| Suitable for public clients | Yes | Yes* | No | No |
| Refresh token possible | No | Yes | Yes | No |
| Communication in one roundtrip | Yes | No | No | Yes |
| Tokens revealed to User Agent | Yes | No | Yes | No |
*With PKCE
Client credential flow
This flow is suitable for machine-to-machine authentication, for example for use in a scheduled job which is performing maintenance tasks over an API. Another example would be a piece of software making requests to an API that does not require user permission.
In the client credentials flow, the authentication would rely on a (shared) secret as the means of authentication. The client secret will be registered with U4IDS and known to the client. The shared secret will be sent to U4IDS during an authentication request to obtain an access token. In the authentication request the client will also need to specify what scopes (resources) it needs access to.
Step 1. - Request access token Client requests a response using the secret at the Token Endpoint.
Example token request
POST /token

grant_type=client_credentials&client_id=<client_id>&client_secret=<secret>&scope=<scope>
| Parameter name | Description |
|---|---|
| grant_type | Specifies that client credentials are used to obtain access token.. |
| client_id | The unique identifier of the client application. |
| client_secret | The shared client secret. |
| scope | The resource scopes identifying resource servers. |
Step 2. - Token response
Client receives a response that contains the access token.
Step 3. - Request resource
The client requests the resource from the protected resource server. The client uses the Access token that includes the scope defined in the token request.
Authorization code flow
The Authorization Code Flow is intended for clients that can securely maintain a Client Secret between themselves and the U4IDS. See confidential clients for details.
The authorization code flow returns an authorization code that can then be exchanged for an ID token and access token. This requires client authentication using a client ID and secret to retrieve the tokens from the back-end and has the benefit of not exposing tokens to the User Agent. This flow allows for long lived access (through the use of refresh tokens). This flow obtains the authorization code from the Authorization Endpoint and all tokens are returned from the Token endpoint.
This mechanism was originally designed for server-based applications only, since storing client secrets on a client device is dubious without the correct security mechanisms in place.
Authorization code flow steps
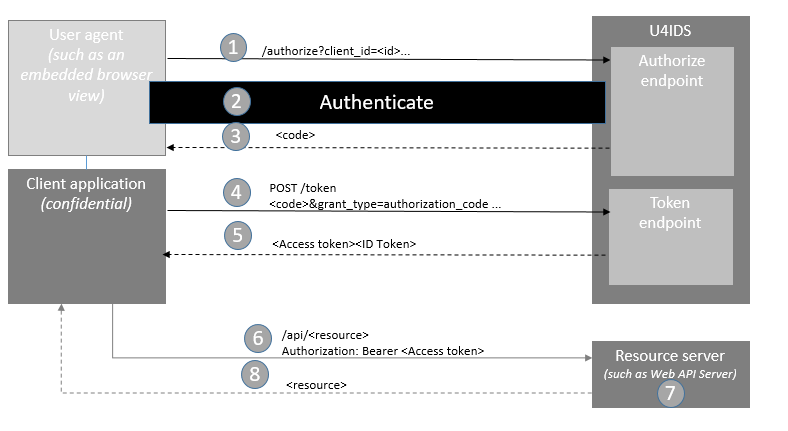
Step 1. - Authorize request
The client prepares an Authentication Request containing the desired request parameters and sends the request to the U4IDS authorize endpoint.
Authorize request example
GET /connect/authorize?client_id=<id>&scope=<scope>&acr_values=tenant:<tenantID>&response_type=code&redirect_uri=<uri> HTTP/1.1
Host: server.example.com
Accept: application/json
The following properties are available for the authorization request:
| Parameter name | Description |
|---|---|
| client_id (required) | The identifier for the client registered. |
| scope (required) | The name of the scope for the resource server to access. openid scope is required. To access a resource server you should also provide the scope for the resource server. |
| response_type (required) | Valid value for code flow is code. |
| redirect_uri (required) | The client uri of where to redirect when authentication is done. Redirection URI to which the response will be sent. This URI MUST exactly match one of the Redirection URI values for the Client pre-registered at the OpenID Provider, with the matching performed as described in Section 6.2.1 of [RFC3986] (Simple String Comparison). When using this flow, the Redirection URI MUST NOT use the http scheme unless the Client is a native application, in which case it MAY use the http: scheme with localhost as the hostname. |
| tenant (required) | The identifier of the tenant that specifies the authentication. The tenant id is specified via the acr-values parameter, on this format tenant:tenant_id. |
| loginidp | The identifier of a Identity Provider that is about to authenticate the user (see above). |
| response_mode | Specifies how the token is returned back to the client. Default for this flow is fragment. See Response types and Response modes |
| nonce (optional) | String value used to associate a Client session with an ID Token, and to mitigate replay attacks. The value is passed through unmodified from the Authentication Request to the ID Token. Sufficient entropy MUST be present in the nonce values used to prevent attackers from guessing values. For implementation notes, see Section 15.5.2. |
| state(recommended) | Opaque value used to maintain state between the request and the callback. Typically, Cross-Site Request Forgery (CSRF, XSRF) mitigation is done by cryptographically binding the value of this parameter with a browser cookie. |
| login_hint | Hint to the Authorization Server about the login identifier the End-User might use to log in. |
| prompt | Specifies whether the Authorization Server prompts the End-User for reauthentication and consent, see above. |
Step 2. - Authentication
Since U4IDS is a federated gateway with no user repository, the authentication occurs on the tenant's identity provider (external IdP). U4IDS looks up the tenant ID from the acr_values on the authorize request and finds the tenant's identity provider and redirects for authentication.
Step 3. - Code response
The authorization code flow returns an authorization code via the user agent (unauthenticated front channel, such as an embedded browser window).
Step 4. - Request token
The client requests a response using the Authorization Code at the Token Endpoint. This requires client authentication using client ID and secret (or some other mechanism) to retrieve the actual tokens (including a refresh token) via the back channel, confidential client.
If the user has consented to offline_access scope the token response will also contain a refresh token. The refresh token can be used to exchange for a new access token when an access token has expired.
Request access token
Example token request using credentials (client_id and client secret) in body
POST /token

code=<code>&grant_type=authorization_code&client_id=<client_id>&client_secret=<secret>
An alternative authentication method is sending a JWT token with X509 certifcate in client_assertion parameter accompanied by
client_assertion_type, see private_key_jwt in OpenID Connect specs.
In this method the thumbprint of a certificate added to the header of JWT token has to be stored as client secret in IDS and
be of Type X509Thumbprint. client_id & client_secret should not be passed in this case.
| Parameter name | Description |
|---|---|
| code | The authorization code obtained from in the previous step. |
| grant_type | authorization_code specifies that a authorization code is used to obtain tokens. refresh_token specifies that refresh token is used to obtain a new token. |
| client_id | The unique identifier of the client application. |
| client_secret | The shared client secret. |
| redirect_uri | Although tokens are sent back as response content (not sent to "redirect uri") this parameter is required and must be registered in IDS as a client's valid redirect URI. |
| client_assertion | a serialized JWT token. |
| client_assertion_type | must be 'urn:ietf:params:oauth:client-assertion-type:jwt-bearer' |
Request refresh token
Example of a refresh token request
POST /token

refresh_token=<refresh_token>&grant_type=refresh_token&client_id=<client_id>&client_secret=<client_secret>&scope=<scope>
| Parameter name | Description |
|---|---|
| refresh_token | The refresh token stored in . |
| grant_type | refresh_token specifies that refresh token is used to obtain a new token. |
| client_id | The unique identifier of the client application. |
| client_secret | The shared client secret. |
Step 5. - Token response
The client receives a response that contains an ID Token and Access Token in the response body.
Step 6. - Request resource
The client requests the resource from the protected resource server. The client uses the Access token.
Example request a resource with the access token
GET  /api/<resource>
Host: server.example.com
Accept: application/json
Authorization: Bearer <Access token>
Step 7. - Token validation
The resource server validates the tokens for signature, expected issuer name, expected audience or scope.
Step 8. - Resource response
If token validation success the resource server sends the requested resource back to the client.
See code flow specification for details.
Authorization code flow with PKCE
The Authorization Code Flow + PKCE is an OpenId Connect flow specifically designed to authenticate native or mobile application users.
PKCE, pronounced “pixy” is an acronym for Proof Key for Code Exchange. The key difference between the PKCE flow and the standard Authorization Code flow is users aren’t required to provide a client_secret. PKCE reduces security risks for native apps, as embedded secrets aren’t required in source code, which limits exposure to reverse engineering.
Steps
In place of the client_secret, the client app creates a unique string value, code_verifier, which it hashes and encodes as a code_challenge. When the client app initiates the first part of the Authorization Code flow, it sends a hashed code_challenge. Once the user authenticates and the authorization code is returned to the client app, it requests an access_token in exchange for the authorization code. In this step, the client app must include the original unique string value in the code_verifier parameter. If the codes match, the authentication is complete and an access_token is returned.
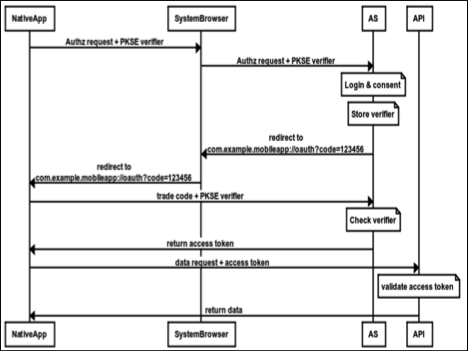
You dont need to have a secret in this flow, but if a secret is added to the client then it must be provided during authorization.
Implicit flow
In Implicit flow the ID token and access token are directly returned to the client. When using the implicit flow, the server does not perform client authentication. This flow is mainly used by web browser client-side rendered applications (such as a JavaScript client).
The implicit flow requests tokens without explicit client authentication, instead using the redirect URI to verify the client identity. Because of this, long lived tokens are not allowed. This is the simplest flow to implement as it only needs to redirect to the user the location of the OIDC provider. This flow obtains all of its tokens from the Authorization endpoint.
Steps
In the scenario where a client is using an access token to access resources on ANOTHER server (the Resource Server), the RS must lookup attributes of the access token with the issuer. How to include that token as part of a request for a protected resource and how the protected resource can check the token is described below. The figure below shows the steps for an implicit authentication flow done in U4IDS.
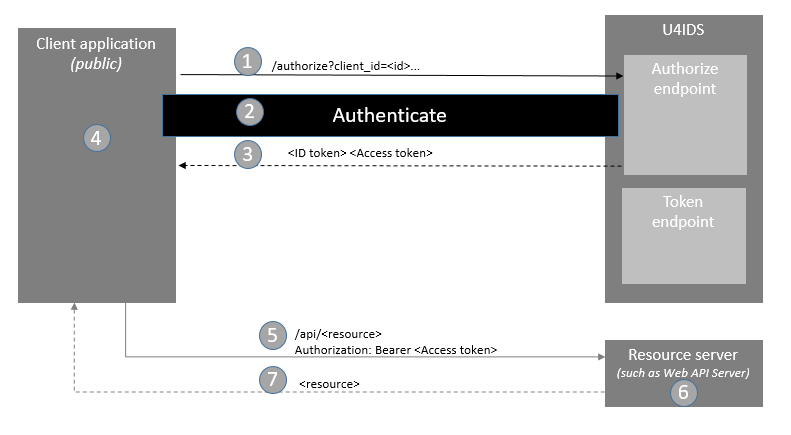
Step 1. - Authorize request
The client prepares an Authentication Request containing the desired request parameters and sends the request to the U4IDS authorize endpoint.
Authorize request example
GET /connect/authorize?client_id=<id>&scope=<scope>&acr_values=tenant:<tenantID>&response_type=id_token%20token&redirect_uri=<uri> HTTP/1.1
Host: server.example.com
Accept: application/json
For the authorize request the following properties are available:
| Parameter name | Description |
|---|---|
| client_id (required) | The identifier for the client registered. |
| scope (required) | The name of the scope for the resource server to access. openid scope is required. To access a resource server you should also provide the scope for the resource server. |
| response_type (required) | Specifies the type of token to receive. Valid values for implicit flow are token, id_token and id_token token. NOTE: While OAuth 2.0 also defines the token Response Type value for the Implicit Flow, OpenID Connect does not use this Response Type, since no ID Token would be returned. |
| redirect_uri (required) | The client uri of where to redirect when authentication is done. Redirection URI to which the response will be sent. This URI MUST exactly match one of the Redirection URI values for the Client pre-registered at the OpenID Provider, with the matching performed as described in Section 6.2.1 of [RFC3986] (Simple String Comparison). When using this flow, the Redirection URI MUST NOT use the http scheme unless the Client is a native application, in which case it MAY use the http: scheme with localhost as the hostname. |
| tenant (required) | The identifier of the tenant that specifies the authentication. The tenant id is specified via the acr_values parameter, on this format tenant:tenant_id. |
| loginidp | The identifier of a Identity Provider that is about to authenticate the user. The identifier must match the value of the IdpName attribute of the tenant specified in the request (see above). The loginidp is specified via the acr_values parameter with the following format loginidp:IdpNameValue with space as the separator between tenant and loginidp parameters. |
| response_mode | Specifies how the token is returned back to the client. Default for this flow is fragment. See Response types and Response modes |
| nonce (required) | String value used to associate a Client session with an ID Token, and to mitigate replay attacks. The value is passed through unmodified from the Authentication Request to the ID Token. Sufficient entropy MUST be present in the nonce values used to prevent attackers from guessing values. For implementation notes, see Section 15.5.2. |
| state (recommended) | Opaque value used to maintain state between the request and the callback. Typically, Cross-Site Request Forgery (CSRF, XSRF) mitigation is done by cryptographically binding the value of this parameter with a browser cookie. |
| login_hint | Hint to the Authorization Server about the login identifier the End-User might use to log in. |
| prompt | Specifies whether the Authorization Server prompts the End-User for reauthentication and consent, see Authentication Request. 'login' value can be very useful to reauthenticate the user with a different tenant (get a new id token) while opening a new browser's tab - otherwise the current session will be used. 'select_account' is not supported by IDS. 'consent' does not raise error when a consent has not been given. |
Step 2. - Authentication
Since U4IDS is a federated gateway with no user repository, the authentication happens on the tenant's identity provider (external IdP). U4IDS looks up the tenant ID from the acr_values on the authorize request and finds the tenant's identity provider and redirects for authentication.
Step 3. - Token response
U4IDS sends the end user back to the Client with an ID Token and, if requested, an Access token.
Step 4. - ID Token validation
The client validates the ID token and retrieves the end user's Subject Identifier.
Step 5. - Request resource
The client requests the resource from the protected resource server. The client uses the Access token.
Example request a resource with the access token
GET  /api/<resource>
Host: server.example.com
Accept: application/json
Authorization: Bearer <Access token>
Step 6. - Access Token Validation
The resource server validates the tokens for signature, expected issuer name, expected audience or scope.
Step 7. - Resource response
If token validation is successful, the resource server sends the requested resource back to the client.
See implicit flow specification for details.
Hybrid flow
The hybrid flow combines aspects of the Authorization Code Flow and the Implicit Flow. It allows to request a combination of identity token, access token and code via the front channel using either a fragment encoded redirect (native and JS based clients) or a form post (server-based web applications). This enables, for example, scenarios where your client app can make immediate use of an identity token to get access to the user’s identity but also retrieve an authorization code that that can be used (for example by a backend service) to request a refresh token and thus gain long lived access to resources. It enables clients to obtain an ID Token and optionally an Access Token with only one round trip to U4IDS, possibly minimizing latency, while still enabling clients for long lived access. Tokens can be obtained later from the token endpoint again through the use of refresh tokens.
Hybrid flow steps

Step 1. - Authorize request
The client prepares an Authentication Request containing the desired request parameters. Note that the response type must be code combined with some other response type, for example id_token or token (or both). The client sends the request to U4IDS.
Authorize request example
GET /authorize?response_type=code%20id_token&client_id=<client_id>&redirect_uri=<redirect_uri>&scope=<scope>&acr_values=tenant:<tenantID> HTTP/1.1
Host: server.example.com
Accept: application/json
For the the authorize request the following properties are available:
| Parameter name | Description |
|---|---|
| client_id (required) | The identifier for the client registered. |
| scope (required) | The name of the scope for the resource server to access. openid scope is required. To access a resource server you should also provide the scope for the resource server. |
| response_type (required) | OAuth 2.0 Response Type value that determines the authorization processing flow to be used, including what parameters are returned from the endpoints used. When using the Hybrid Flow, this value is code id_token, code token, or code id_token token. |
| redirect_uri (required) | The client uri of where to redirect when authentication is done. Redirection URI to which the response will be sent. This URI MUST exactly match one of the Redirection URI values for the Client pre-registered at the OpenID Provider, with the matching performed as described in Section 6.2.1 of [RFC3986] (Simple String Comparison). When using this flow, the Redirection URI MUST NOT use the http scheme unless the Client is a native application, in which case it MAY use the http: scheme with localhost as the hostname. |
| tenant (required) | The identifier of the tenant that specifies the authentication. The tenant id is specified via the acr_values parameter, on this format tenant:tenant_id. |
| loginidp | The identifier of a Identity Provider that is about to authenticate the user (see above). |
| response_mode | Specifies how the token is returned back to the client. Default for this flow is fragment. See Response types and Response modes |
| nonce (optional) | String value used to associate a Client session with an ID Token, and to mitigate replay attacks. The value is passed through unmodified from the Authentication Request to the ID Token. Sufficient entropy MUST be present in the nonce values used to prevent attackers from guessing values. For implementation notes, see Section 15.5.2. |
| state(recommended) | Opaque value used to maintain state between the request and the callback. Typically, Cross-Site Request Forgery (CSRF, XSRF) mitigation is done by cryptographically binding the value of this parameter with a browser cookie. |
Step 2. - Authentication
Since U4IDS is a federated gateway with no user repository, the authentication occurs on the tenant's identity provider (external IdP). U4IDS looks up the tenant ID from the acr_values on the authorize request and finds the tenant's identity provider and redirects for authentication.
Step 3 - Authentication response
When using the Hybrid Flow, Authentication Responses are made in the same way as for the Implicit Flow. Based on the response_type parameter, the authentication response can contain id_token or access_token or both. The authorization code is always returned using the hybrid flow.
Step 4. - Request tokens The client requests a response using the Authorization Code at the Token Endpoint. This requires client authentication using client ID and secret (or some other mechanism) to retrieve the actual tokens (including a refresh token) via the back channel, confidential client.
Example token request
POST /token

code=<code>&grant_type=authorization_code&client_id=<client_id>&client_secret=<secret>
| Parameter name | Description |
|---|---|
| code | The authorization code obtained from in the previous step. |
| grant_type | Specifies that a authorization code is used to obtain tokens. |
| client_id | The unique identifier of the client application. |
| client_secret | The shared client secret. |
Step 5. - Token response
The client receives a response that contains tokens. The tokens received are dictated by the response_type in the authentication request. If the client has requested access to the offline_access scope, the server responds with a refresh token.
Step 6. - Request resource
The client requests the resource from the protected resource server. The client uses the Access token.
Example request a resource with the access token
GET  /api/<resource>
Host: server.example.com
Accept: application/json
Authorization: Bearer <Access token>
Step 7. - Token validation
The resource server validates the tokens for signature, expected issuer name, expected audience or scope.
Step 8. - Resource response
If token validation success the resource server sends the requested resource back to the client.
See hybrid flow specification for details.
User impersonation custom flow
This flow is suitable for resource APIs that need to call another API on behalf of the user. This scenario involves a normal client application that authenticates the user using any of the standard flows, and at least two APIs where one needs to call another at some point. The caller API needs to use "user_impersonation" flow to access the called API, with an access code obtained by the normal client application.
User impersonation flow steps
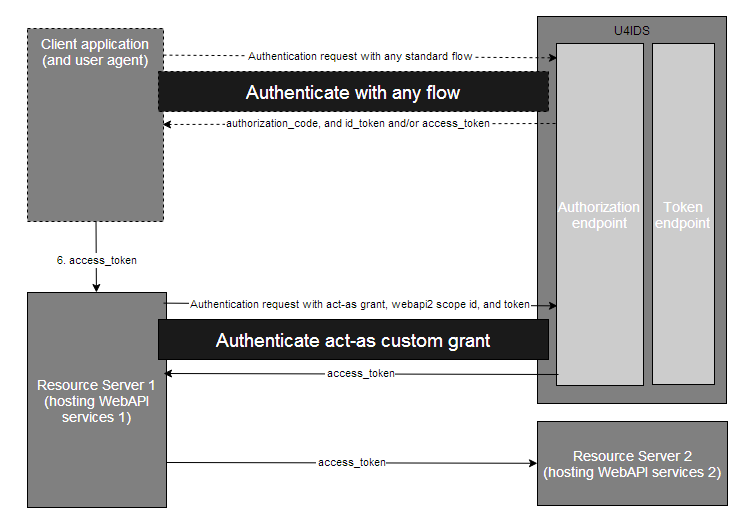
Step 1-3 - Client application authentication
User impersonation flow is different from the previous standard flows in that it involves more than one client application and more than one resources. As shown in the diagram, both the client application and WebAPI1 are registered clients to U4IDS, and both WebAPI1 and WebAPI2 are registered resource scopes. The key part of this flow is about one downstream client (here the WebAPI1 which is also a resource) accesses another resource on behalf of the user. As to the initial authentication of the client application, it can use any of the standard flows. This is not the focus of the user impersonation flow.
Step 4 - Client application request resource 1
The client requests the resource WebAPI1 from the protected resource server. The client uses the Access token obtained from authentication. This step is the same as in implicit/ authorization code /hybrid flows. Not to repeat the details here.
Step 5 - Request (delegated) access token
The WebAPI1 resource requests an access token on behalf of the user at the Token Endpoint. This request uses the user_impersonation custom grant and sends in the forwarded access token, the resource scope ID to be accessed, and the client ID and secret to perform an authentication for WebAPI1 client. If authenticated, U4IDS responds with a new access token granted to WebAPI1 to access WebAPI2 only. In this process the custom grant validator will check if the user has given consent to the requested scopes. As no user interaction is possible in this step, any scopes that has not been consented will not be returned in the token.
Example token request
POST /token

token=<token>&grant_type=user_impersonation&client_id=<client_id>&client_secret=<secret>&scope=<scope>
| Parameter name | Description |
|---|---|
| token | The token forwarded from client application in the request. |
| grant_type | Specifies that the user_impersonation custom grant is used to obtain tokens. |
| client_id | The unique identifier of the client application WebAPI1 |
| client_secret | The shared client secret of WebAPI1 |
| scope | The scope id of WebAPI2 |
Step 6 - Delegate token response
The client WebAPI1 receives a response that contains token to access the specified resource scope WebAPI2 only.
Step 7 - Request resource WebAPI2
The client WebAPI1 requests the resource WebAPI2 from the protected resource server 2. The client uses the access token obtained from step 6.
Step 8 - Access Token Validation
The resource server validates the tokens for signature, expected issuer name, expected audience or scope.
Step 9 - Resource WebAPI2 response
If token validation is successful, the resource server 2 sends the requested resource back to the client WebAPI1.
Claims upgrade custom flow
This flow can be used in combination with human involved flows, when we would like to add additional claims to an access token previously obtained by U4IDS. Given an existing resource server that has additional information about an identified user, this resource server can use the claims upgrade custom flow to ensure that the additional information is added to the access token. This upgraded access token can be used to call another API, by this eliminating an extra round-trip to the resource server. In the examples below we will provide a scenario that uses the claims upgrade flow.
Claims upgrade custom flow steps
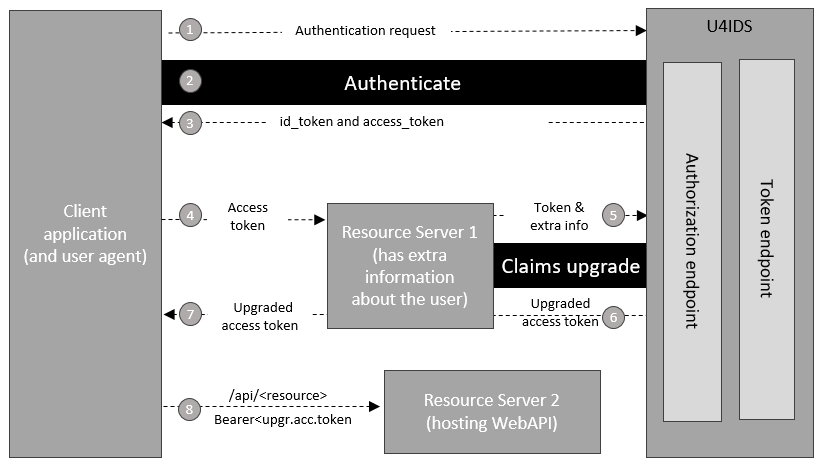
Step 1-3: Client application authentication
Client application uses one of the human involved flow to identify the user and request an access token that can be used with both Resource Server 1 and Resource Server 2. For details please consult the information written above.
Step 4: Client application request claims upgrade from Resource Server 1
Client application calls endpoint on Resource Server 1, providing the access token received on step 3. The resource server identifies the user, looks up the additional information regarding this user.
Step 5: Resource Server 1 request token from U4IDS
Resource Server 1 initiates the claims upgrade custom flow, providing any additional information that needs to add as claims. This is done by posting to the token endpoint from U4IDS, using the claims_upgrade custom grant and providing the original access token, the additional claims to be added, the scope defined for this type of claims upgrade, and the client and secret that protects this flow.
Example token request
POST /token

token=<token>&grant_type=claims_upgrade&client_id=<client_id>&client_secret=<secret>&scope=<scope>&<claimName>=<claimvalue>
| Parameter name | Description |
|---|---|
| token | The token forwarded from client application in the request. |
| grant_type | Specifies that the _claims_upgrade_ custom grant is used to obtain tokens. |
| client_id | The unique identifier of the client application Resource Server 1 |
| client_secret | The shared client secret of Resource Server 1 |
| scope | The scope id defined for this type of upgrade |
| claimName | The claim name to be used for upgrading the original token |
Notes:
- The client identified by
<client_id>needs to be defined as a custom flow, providingclaims_upgradefor theallowedCustomGrantTypes - U4IDS will check that
<claimName>is a claim defined on the provided<scope> - We might have multiple
<claimName>/<claimValue>pairs - Should we have several values for the same
<claimName>, we have to provide these values in the<claimValue>, separated with space. <claimValue>will be treated as string and added accordingly to the claims of the newly generated token.
Step 6: U4IDS returns the upgraded access (and if requested refresh) token
Step 7: Resource server returns the upgraded access (and if requested refresh) token to the client application
Step 8: Client application calls Resource Server 2 hosting the WebAPI services
If token validation is successful, Resource Server 2 will also trust the values from the additional claims.