Resources
Overview
In the Resources tab you can configure how your app sends and retrieves data. You can create multiple resources and use the data from your resources in the components using Liquid (see Liquid support) or in the app's logic (see Events and actions).
Create a new resource by selecting the Plus (+) button on the left panel. Each resource is created with an editable name and a non-editable tag. The tag is used in Liquid to use the resource data within the components, for example {{res1}}.
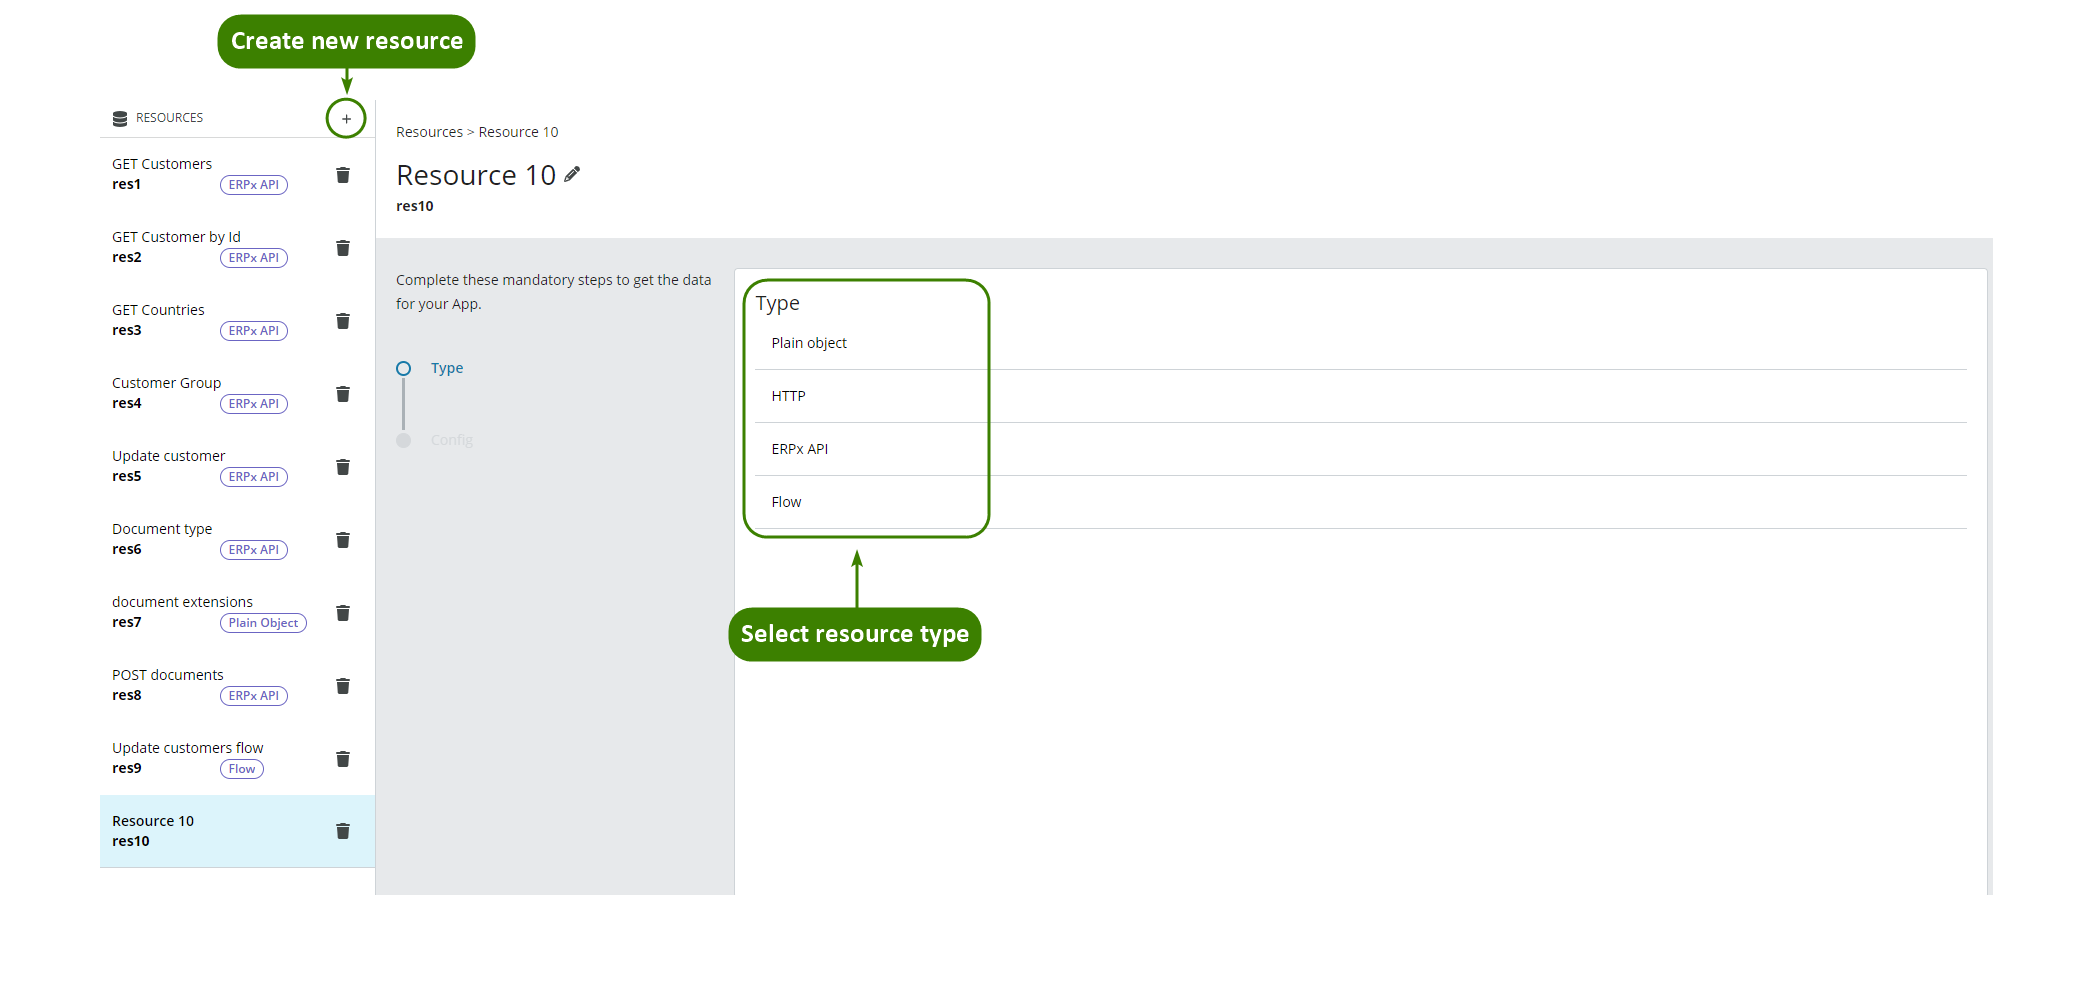
You can create the following types of resource:
Plain Object
Plain object resources are used for storing simple data sets.
Configuration
| Field | Description |
|---|---|
| Code editor | Enter your object in JSON. Max 25.000 characters. 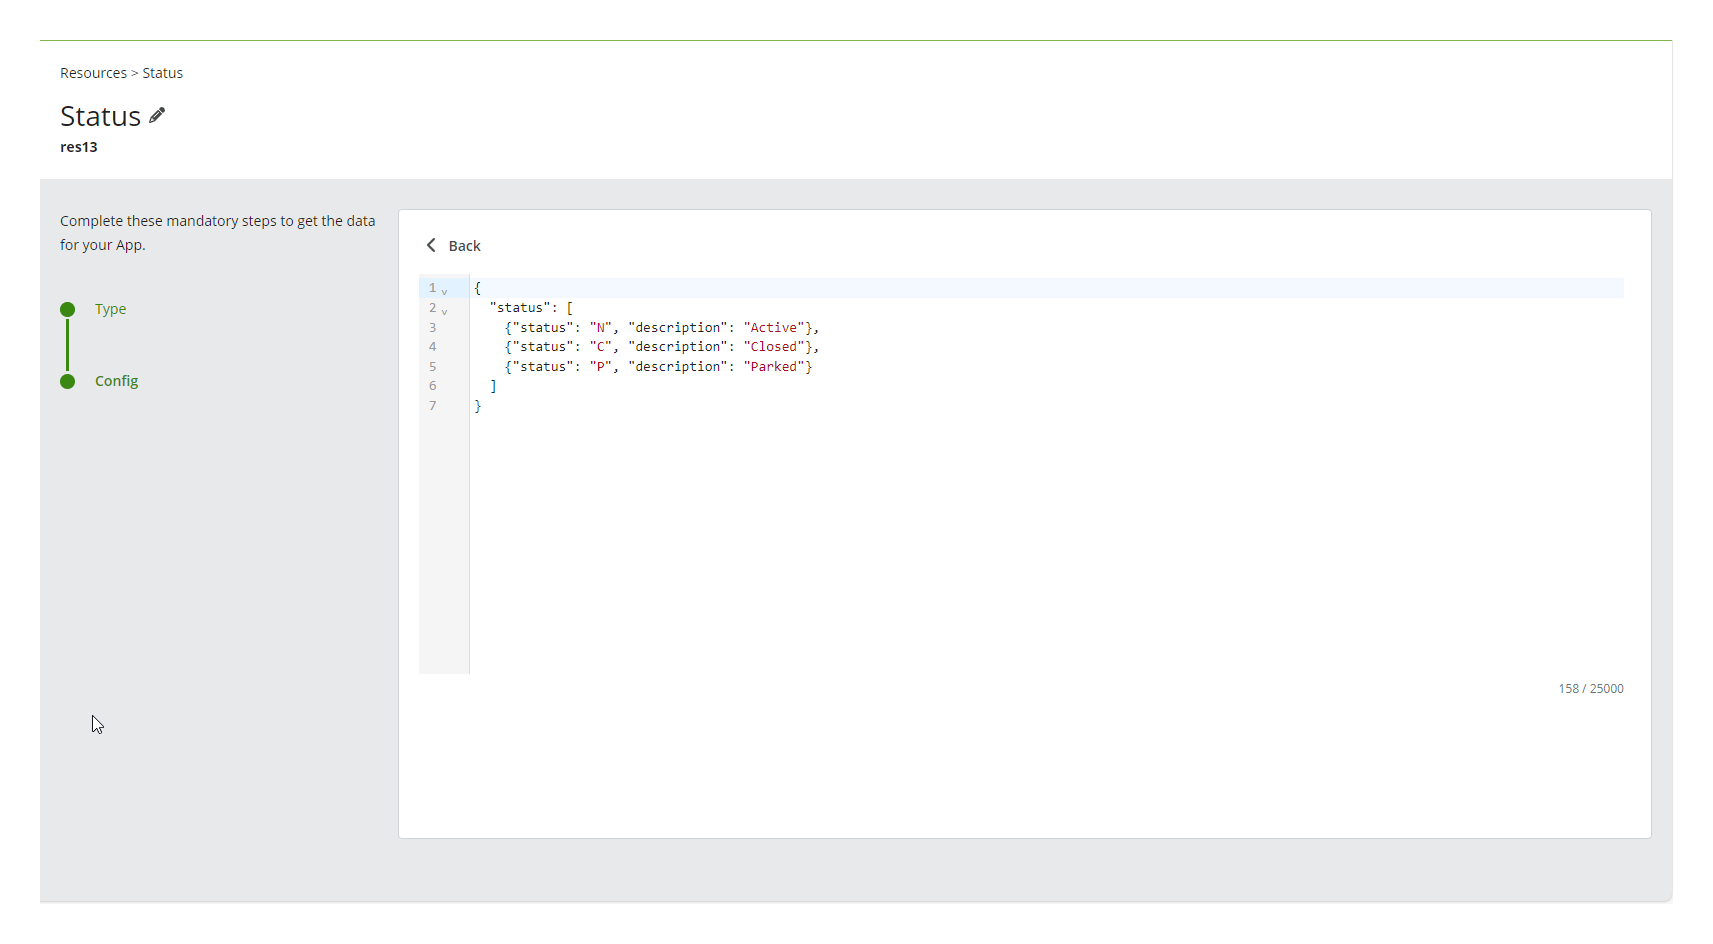 |
Note: App Studio does not support referencing dynamic content in Liquid (templating) in Plain object resources.
HTTP
HTTP resources are used to make HTTP requests. You can configure when the request is made using the HTTP request action. See events and actions for more details.
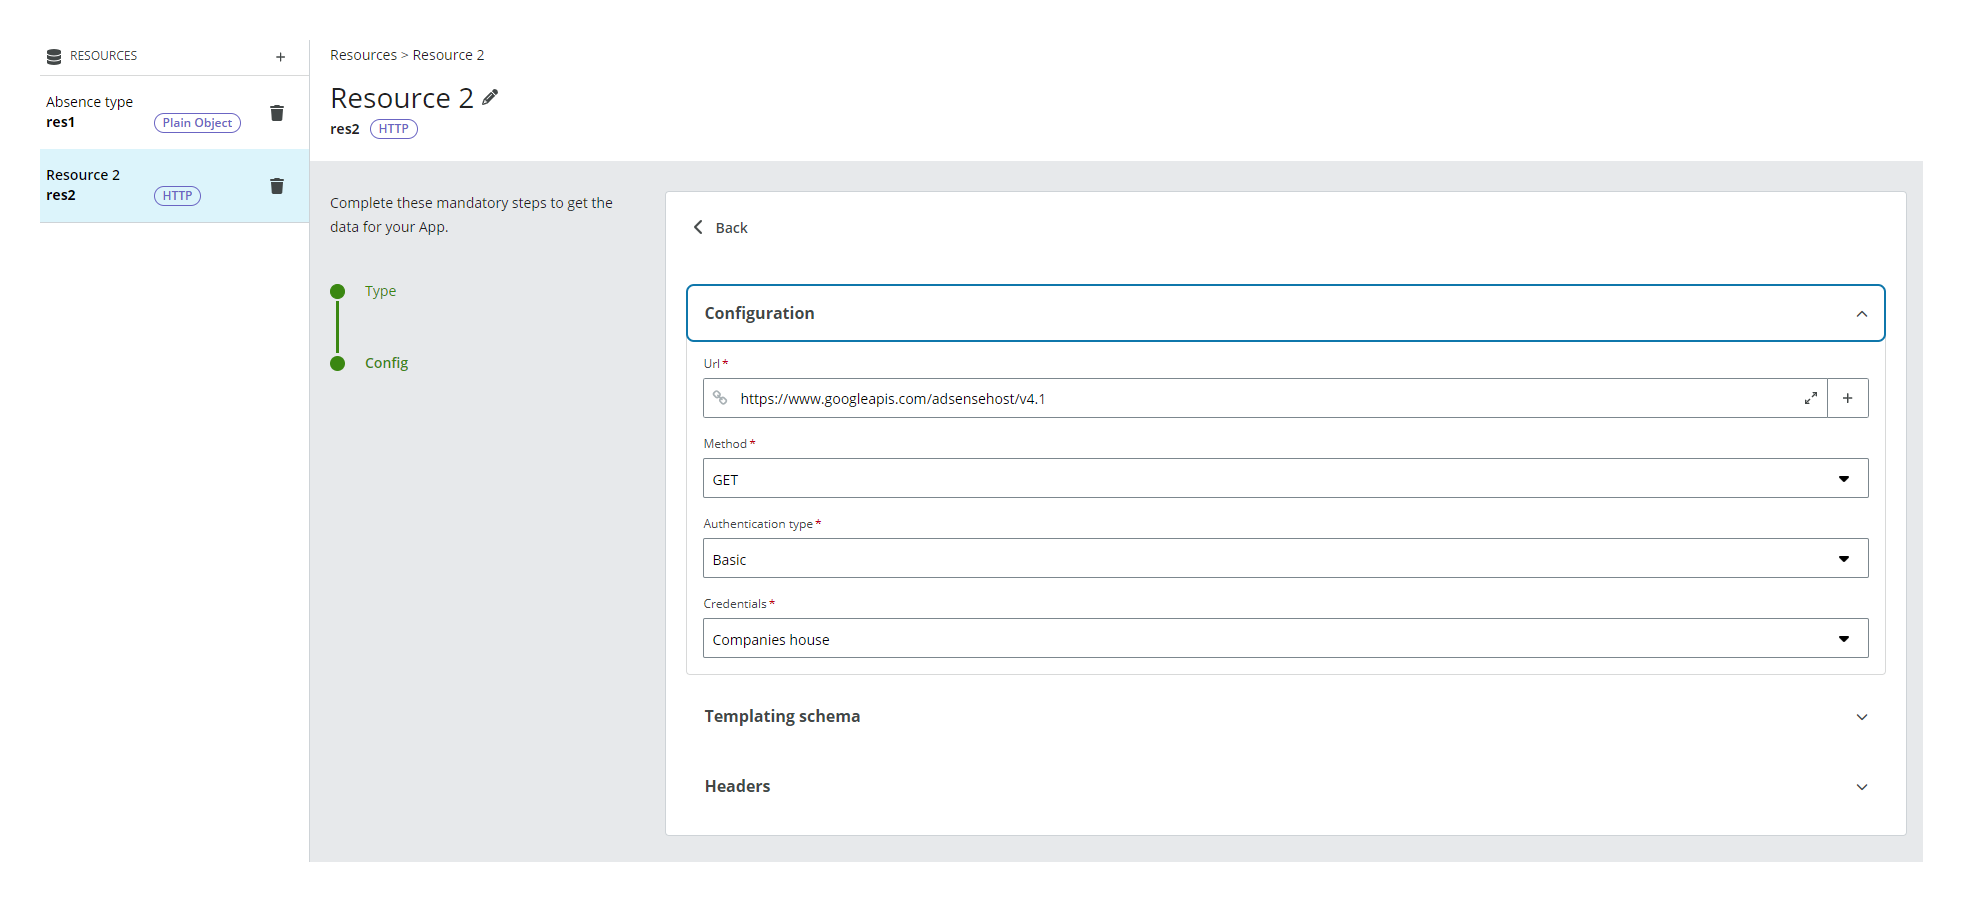
Configuration
| Field | Description | |
|---|---|---|
| Url | Enter an URL. Only HTTPS URLs are allowed. | |
| Method | Select one of the available REST methods: GET, POST, DELETE, PUT, PATCH. |
|
| Authentication type | Select one of the available authentication types: NONE, BASIC, BEARER, U4Ids (Unit4 Identity Services). |
|
| Credentials | Select a credential form the dropdown. This field is only available when you select a BASIC or a BEARER authentication. See App Studio credentials for more details on how to save your credentials. |
|
| Response type | Select the type of response expected from the HTTP request. | |
| JSON | Standard response type for returning structured JSON data (default). | |
| File | Use when the API returns a file. This allows storing and referencing the file in the app. |
Content definition
Available for POST, DELETE, PUT and PATCH methods.
| Field | Description | ||
|---|---|---|---|
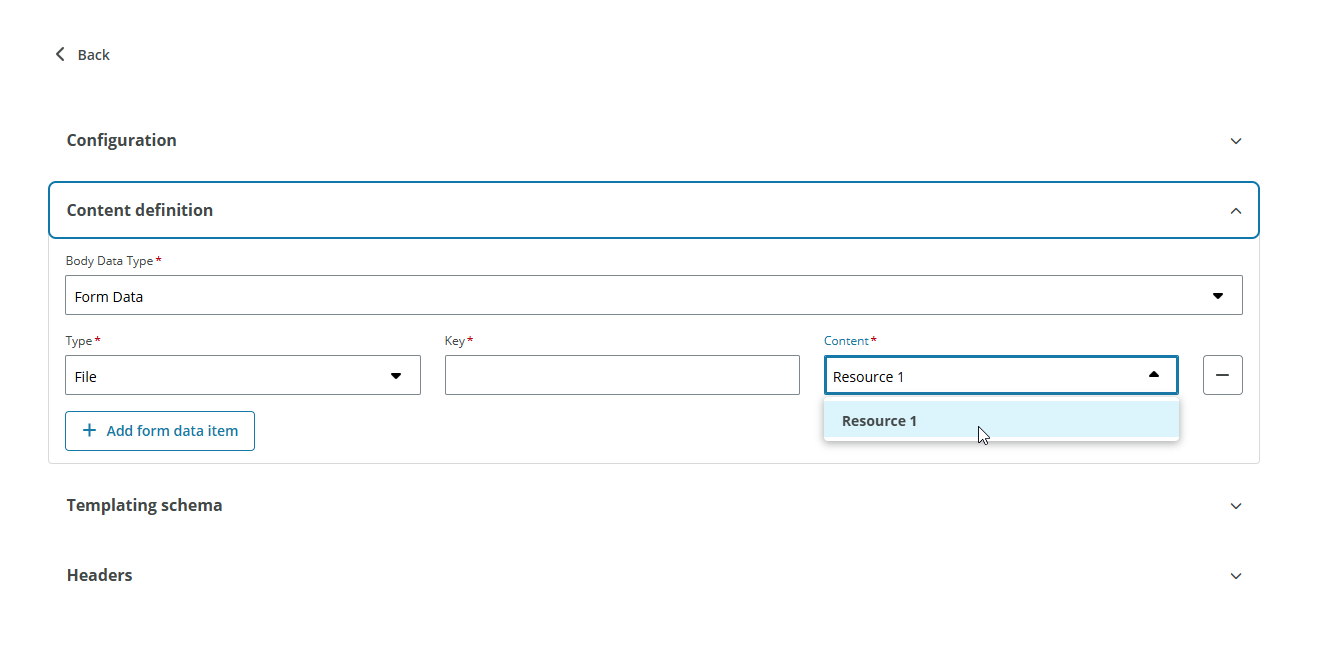
| Body data type | Select from the dropdown JSON or multipart/form-data to send a file. | ||
| JSON | Enter a JSON in the Content field. 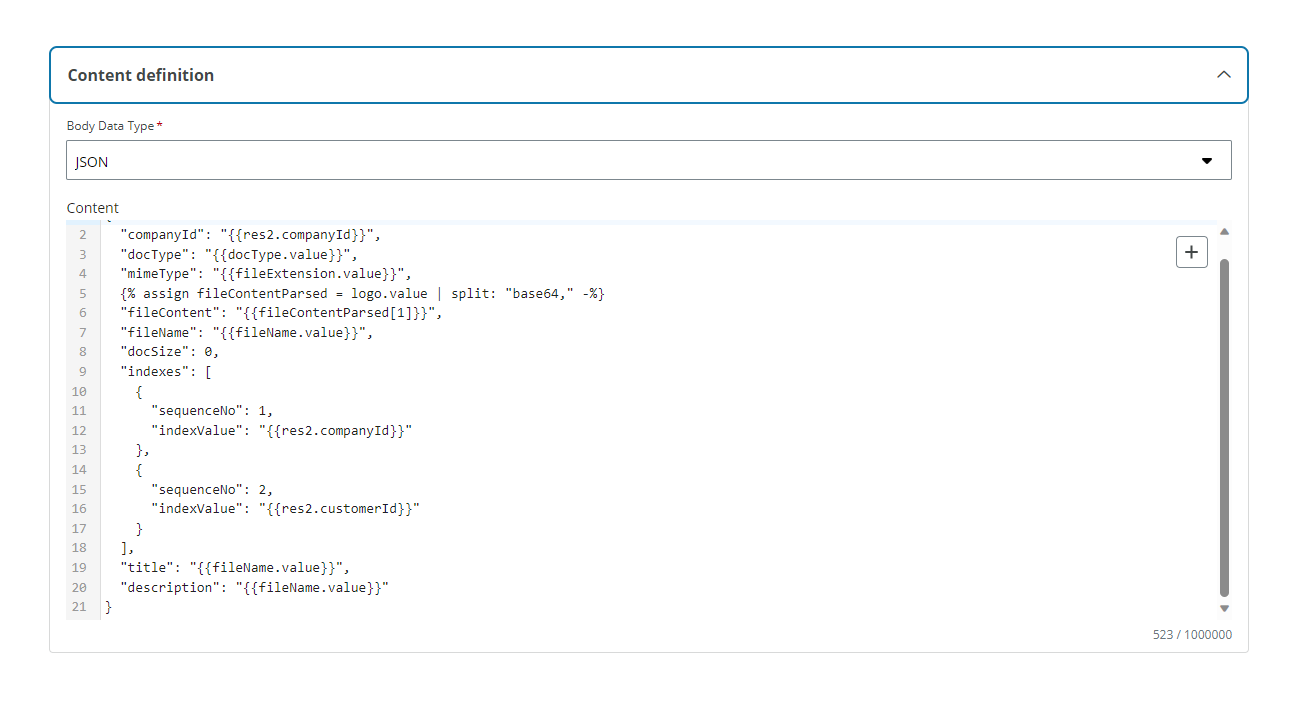 |
||
| Form data | Add the form data items by selecting the + Add form data item button and filling in the following fields: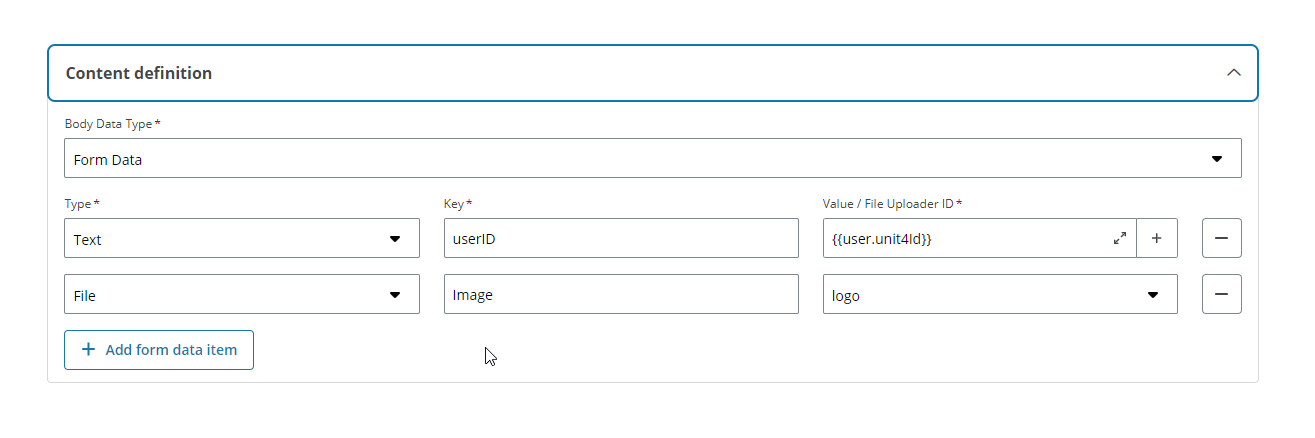 |
||
| Type | Select the type from the dropdown: Text or File. | ||
| Key | Enter the key name. | ||
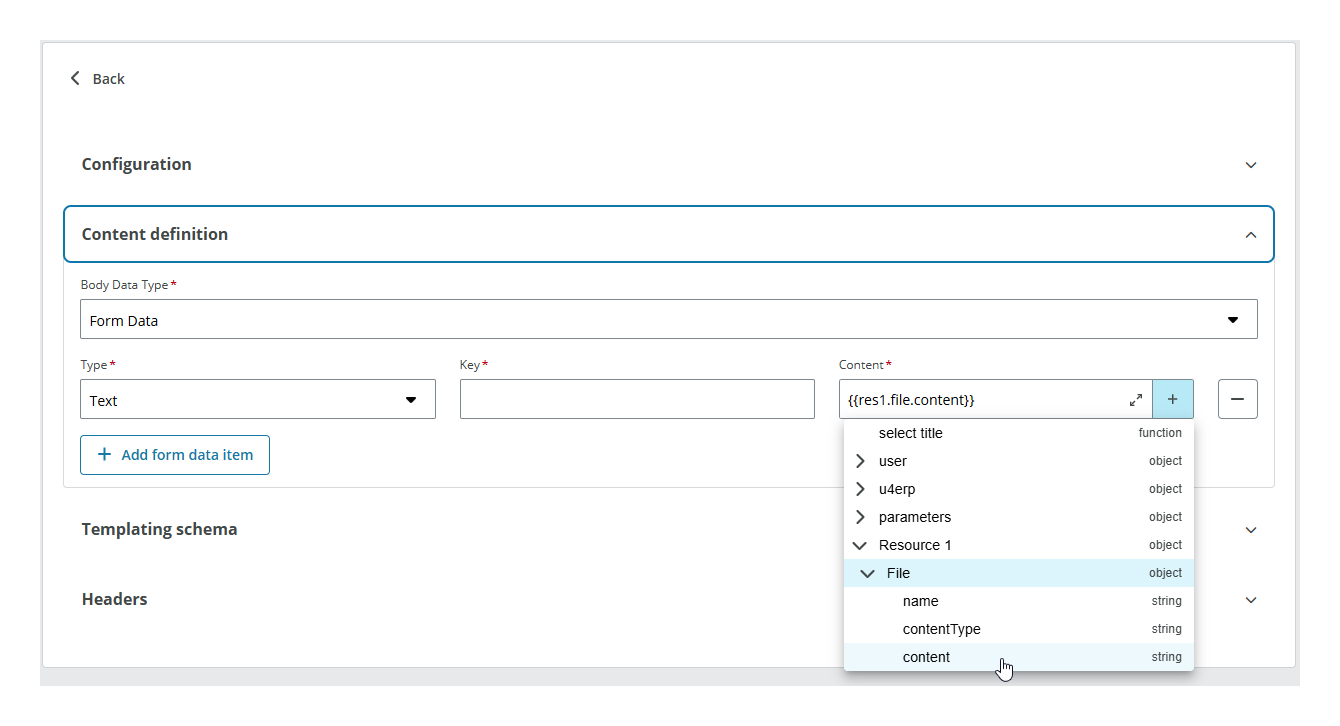
| Content | For Text enter a string, typically hardcoded or coming from a field (see Templating dropdown). For File enter or select the Component ID of a File uploader component that you have added to the Canvas or select any HTTP Resource with Response type: file that you have configured. 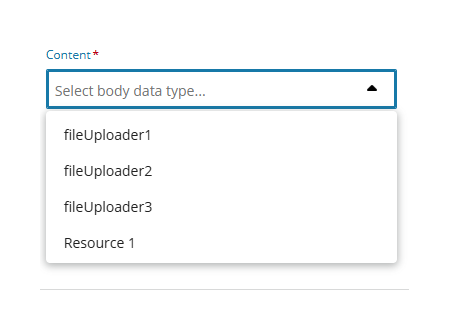 |
Note:
- See File uploader to configure the use of files attached by the user.
- See How to use a downloaded file in an API request for more details.
Templating schema
| Field | Description |
|---|---|
| Schema | Enter a schema that allows you to retrieve data in a component using Liquid. See Templating dropdown for more details.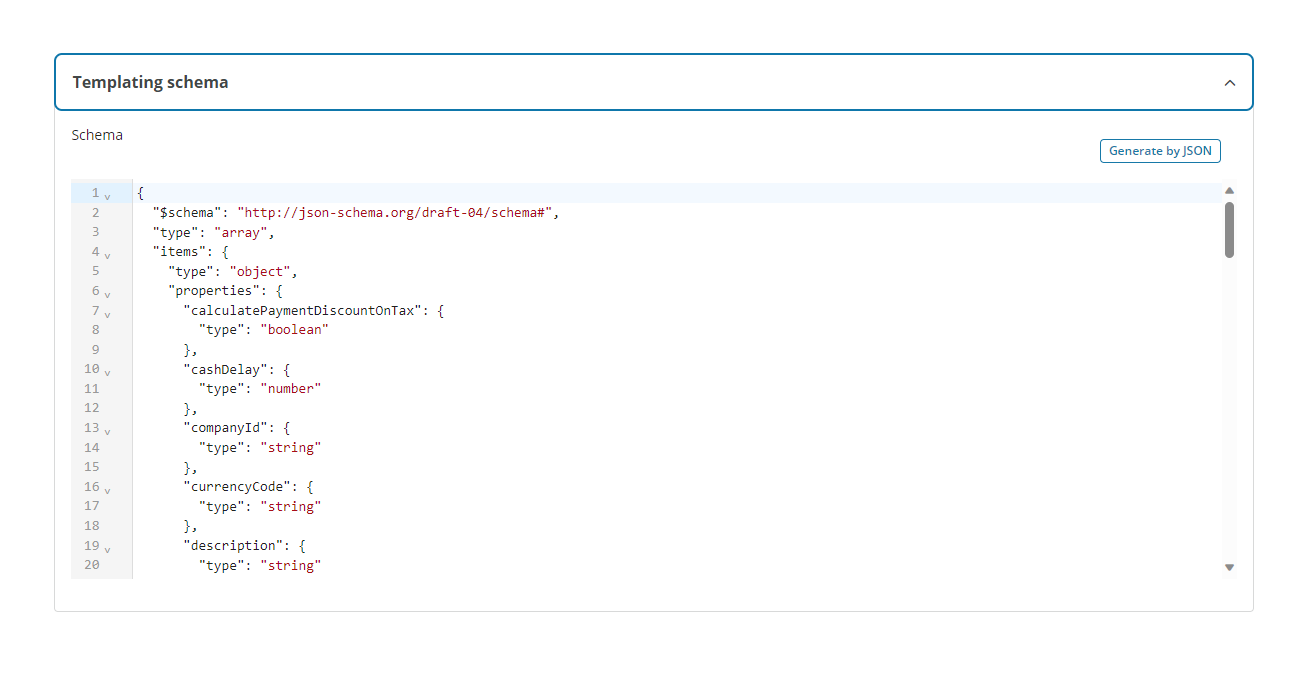 |
| Generate by JSON | Select to automatically generate the Schema from a JSON. |
Headers
| Field | Description |
|---|---|
| Id | Enter the attribute that you want to store. |
| Value | Enter the data for the attribute. |
| + New header | Select the button to add a new header. |
ERPx API
ERPx API resources are used to make HTTP requests to the available ERPx public APIs. You can configure when the request is made using the HTTP request action. See events and actions for more details.
Warning: For the resource to work properly in the end-user app, the user must have access to the ERPx Public APIs and to the specific endpoints you have used. Go to the Public API access (XAG005) window to check your user's configuration.
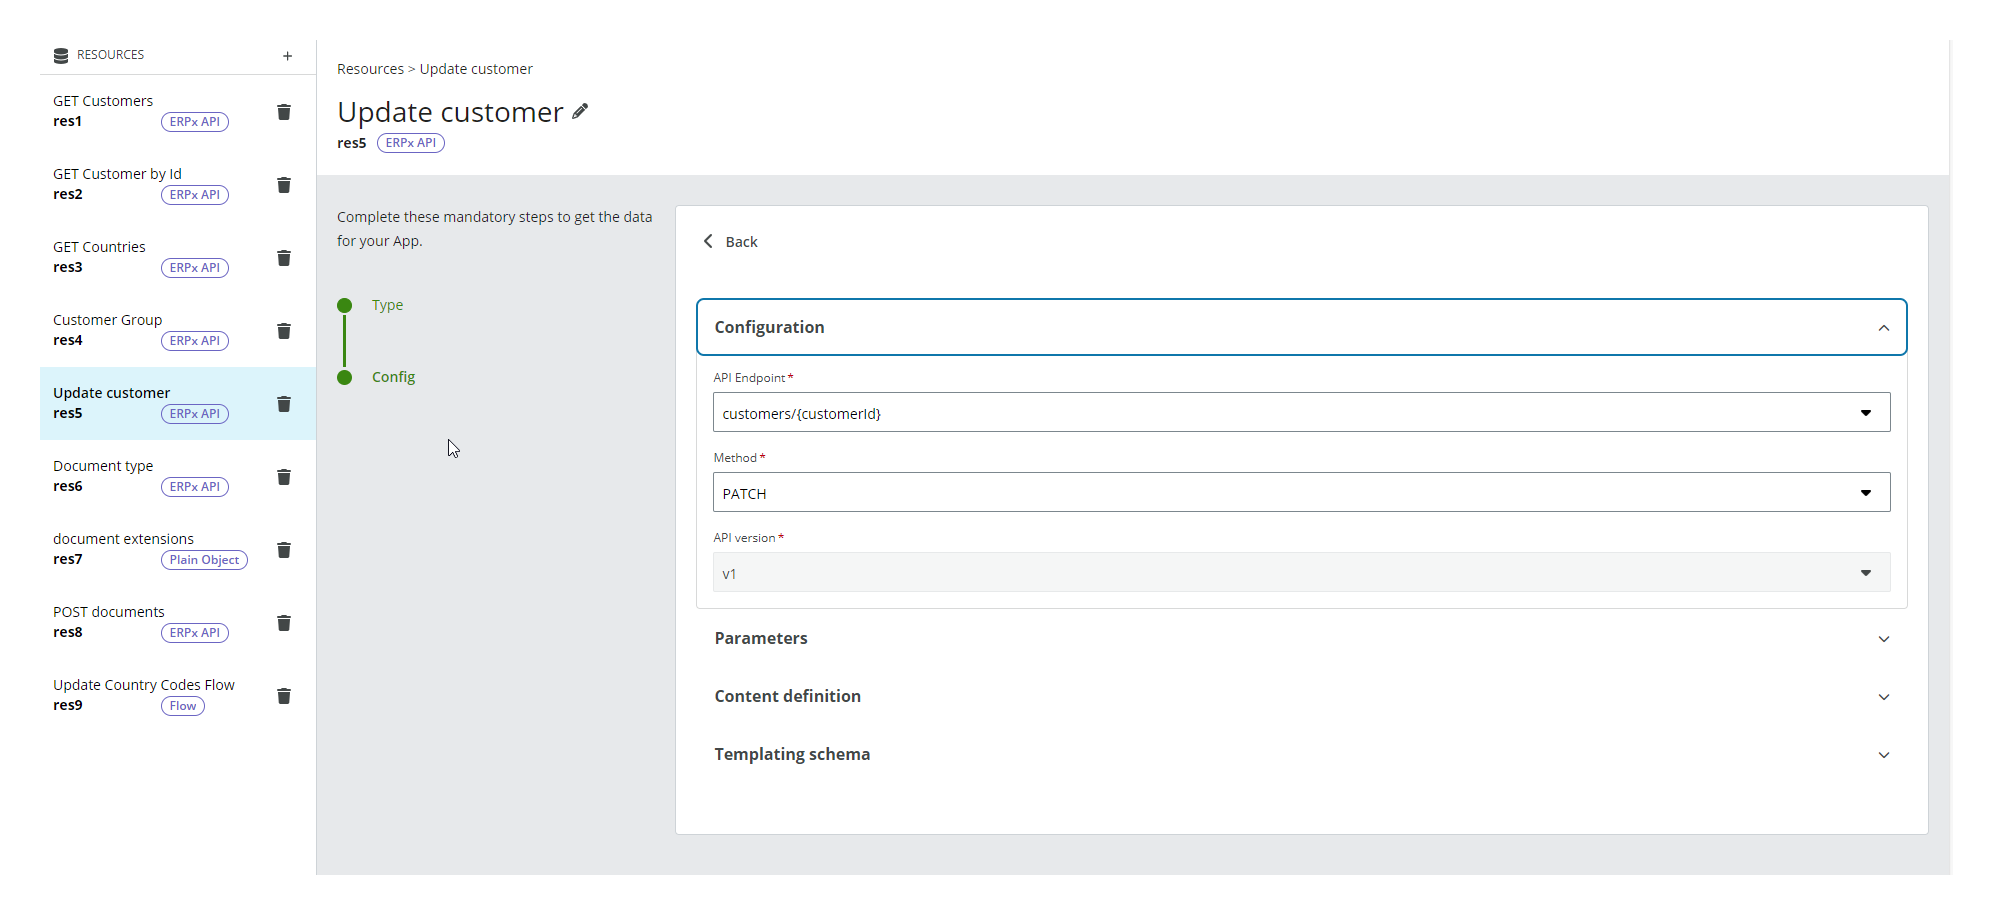
Configuration
| Field | Description |
|---|---|
| API endpoint | Select from the dropdown one of the available endpoints of the ERPx APIs. |
| Method | Select one of the available REST methods: GET, POST, DELETE, PUT, PATCH. The available methods depend on the selected endpoint. |
| API version | Select the API version. The latest available version is selected as default. |
Parameters
The available parameters depend on the endpoint chosen. They are organized in the following groups:
| Field | Description |
|---|---|
| Path | Fill in the fields to define the route of your request within the API. |
| Query | Fill in the fields to refine or filter the results. |
Content definition
Available for POST, DELETE, PUT and PATCH methods.
| Field | Description | ||
|---|---|---|---|
| Body data type | Select from the dropdown JSON or multipart/form-data to send a file. | ||
| JSON | Enter a JSON in the Content field or select the Get sample button to load a sample. 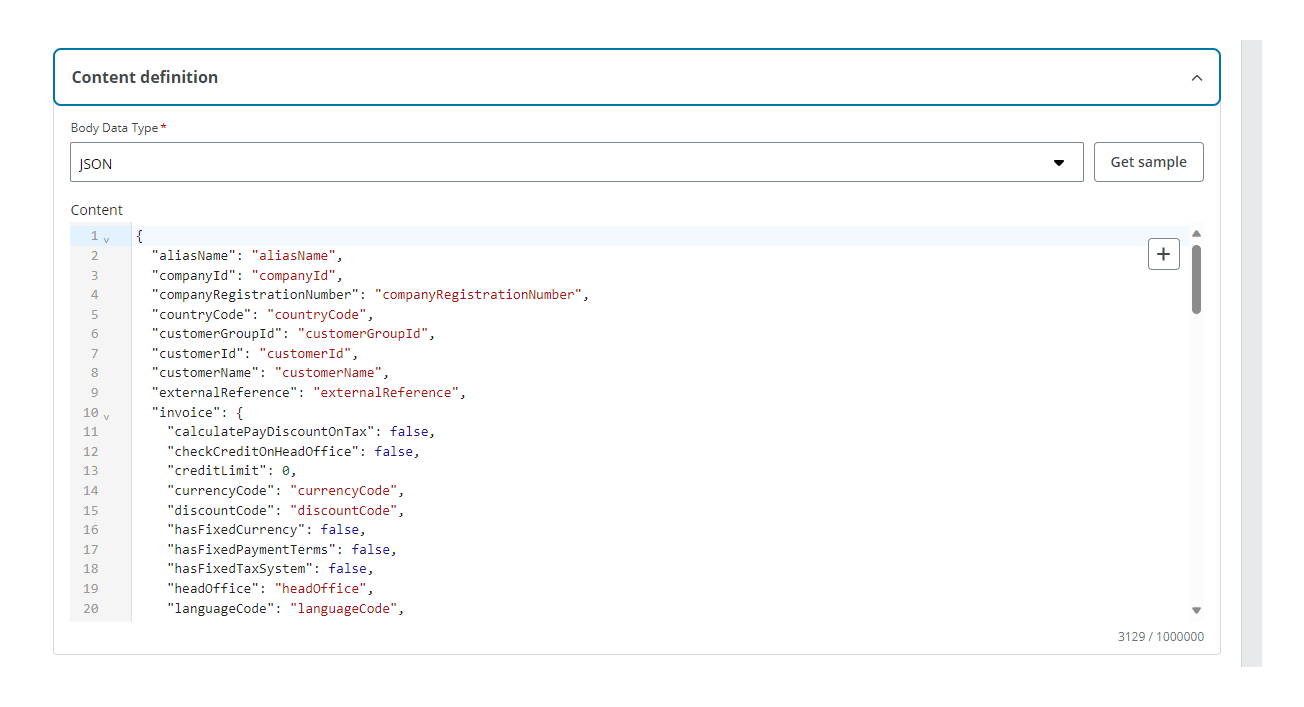 |
||
| Form data | Add the form data items by selecting the + Add form data item button and filling in the following fields: |
||
| Type | Select the type from the dropdown: Text or File. | ||
| Key | Enter the key name. | ||
| Content | For Text enter a string, typically hardcoded or coming from a field (see Templating dropdown). For File enter or select the Component ID of a File uploader component that you have added to the Canvas or select any HTTP Resource with Response type: file that you have configured. |
Note:
- See File uploader to configure the use of files attached by the user.
- See How to use a downloaded file in an API request for more details.
Templating schema
| Field | Description |
|---|---|
| Schema | Enter a schema that allows you to retrieve data in a component using Liquid. See Templating dropdown for more details. The field is pre-filled with the complete schema for the selected API endpoint. 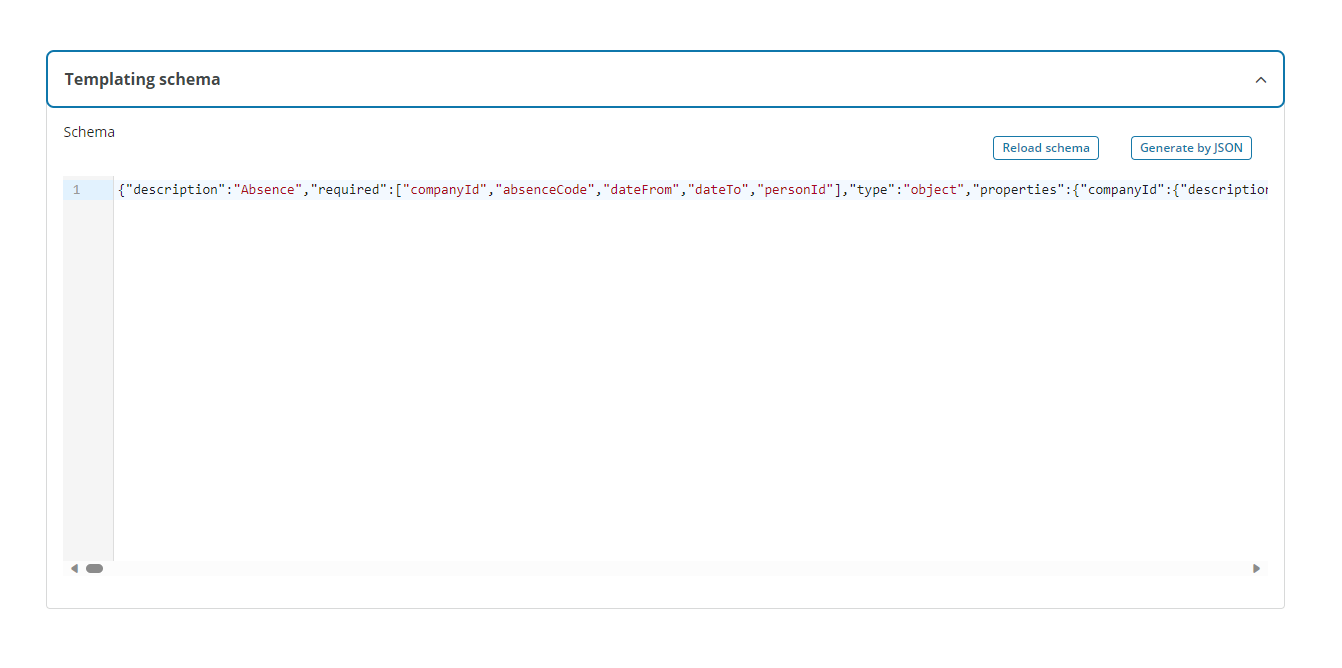 |
| Reload schema | Select to reset the schema. |
| Generate by JSON | Select to automatically generate the Schema from a JSON. |
Flow
Flow resources are used to integrate your app with a flow in Extension Kit. This allows you to obtain data from the flow, delegate complex logic or processes, or do heavy tasks in the background. You can configure when the flow is triggered using the Trigger flow action. See events and actions for more details.
The flow must be configured using the App trigger and the App result action.
Configuration
| Field | Description |
|---|---|
| Flow | Select a flow from the dropdown. Only flows created with the App trigger are available. |
| Create new flow | Select to go to My flows and create a new flow using App trigger. |
| Go to flow | Select to go to My flows and edit/view the selected flow in the Flow dropdown. |
Content definition
| Field | Description |
|---|---|
| Content | Enter the JSON defined in the App trigger. |
Note: See File uploader to configure the use of files attached by the user.
Templating schema
| Field | Description |
|---|---|
| Schema | Enter a schema to retrieve data from the App result action in the flow. You can use it in a component using Liquid. See Templating dropdown for more details 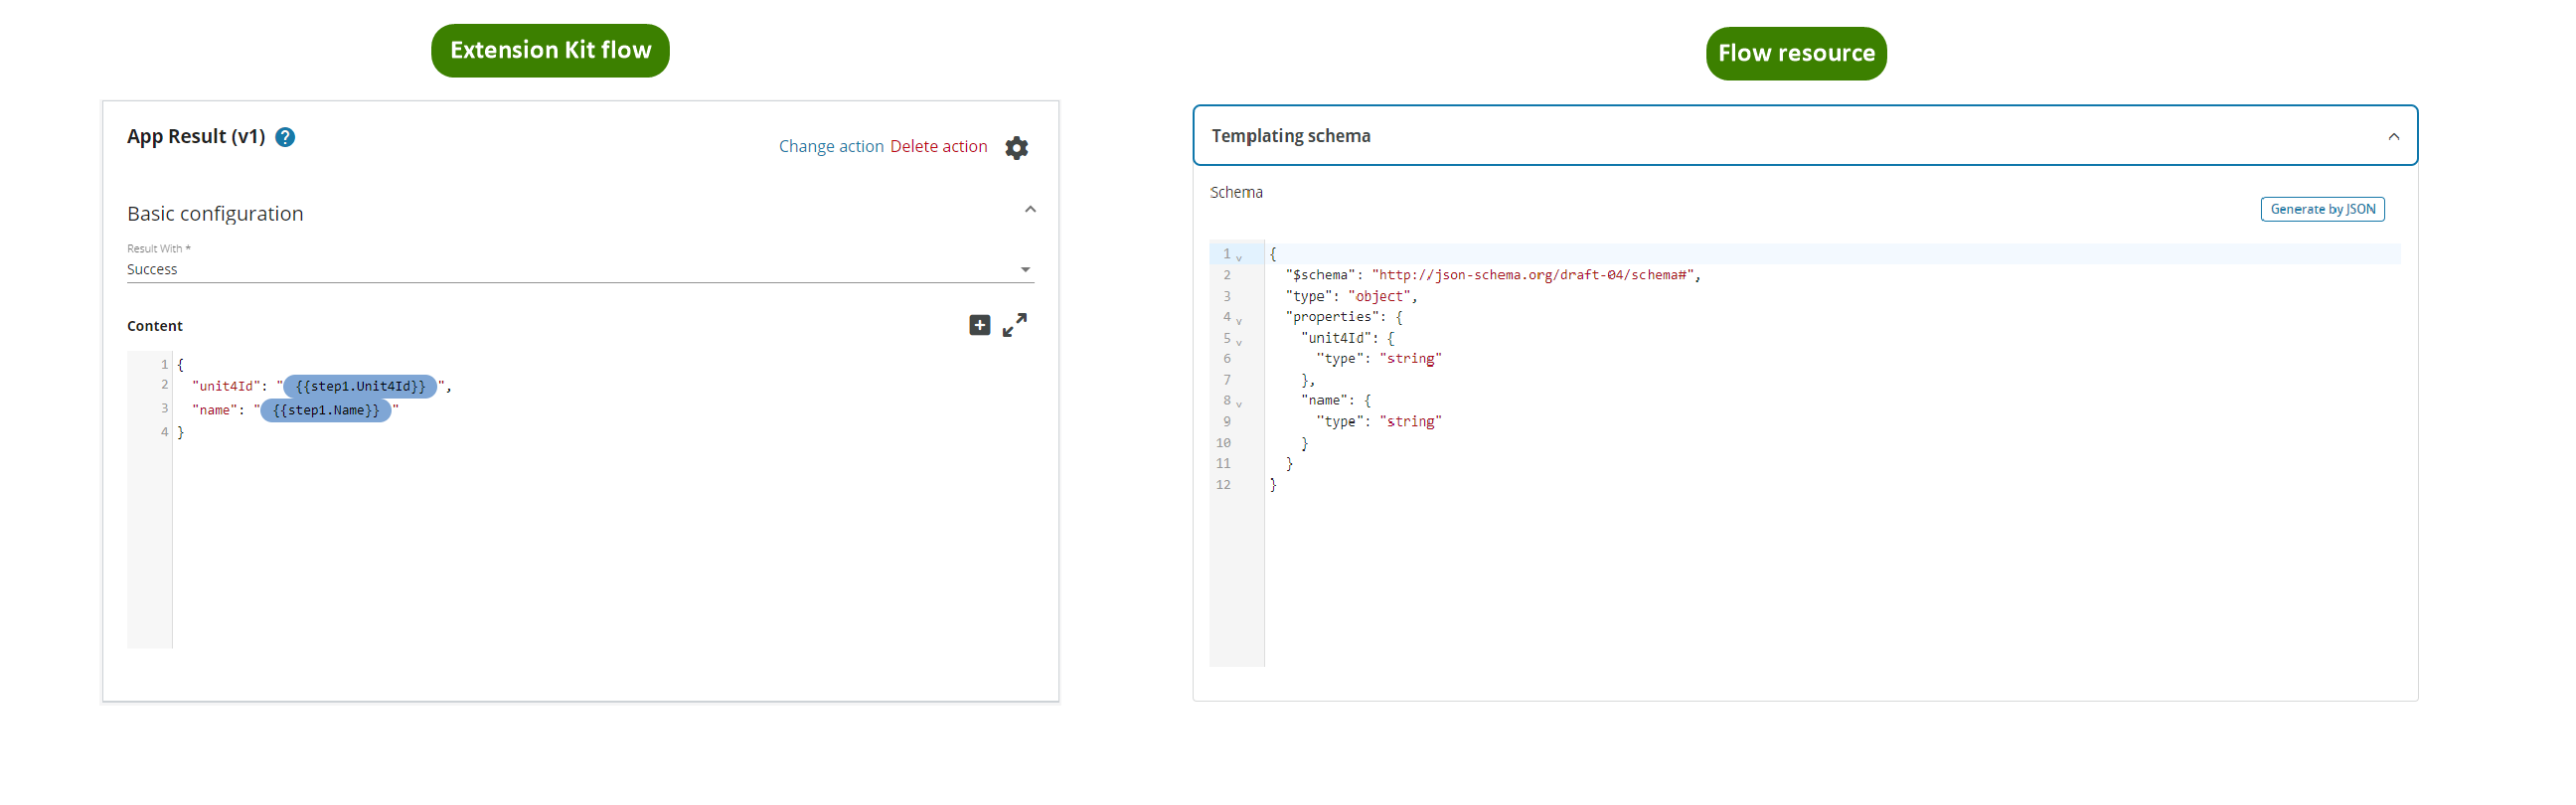 . . |
| Generate by JSON | Select to automatically generate the Schema using the App result action JSON. |
Note: A maximum of five flows are supported per app.
How to use a downloaded file in an API request
When you retrieve a file using an HTTP resource you can use this file as input for another API request.
- Create an HTTP resource with Response type: File to download a file.
-
Create the HTTP or ERPx API resource where you want to use the file. For HTTP resource, configure the Response type as JSON. You have several options to use the file:
-
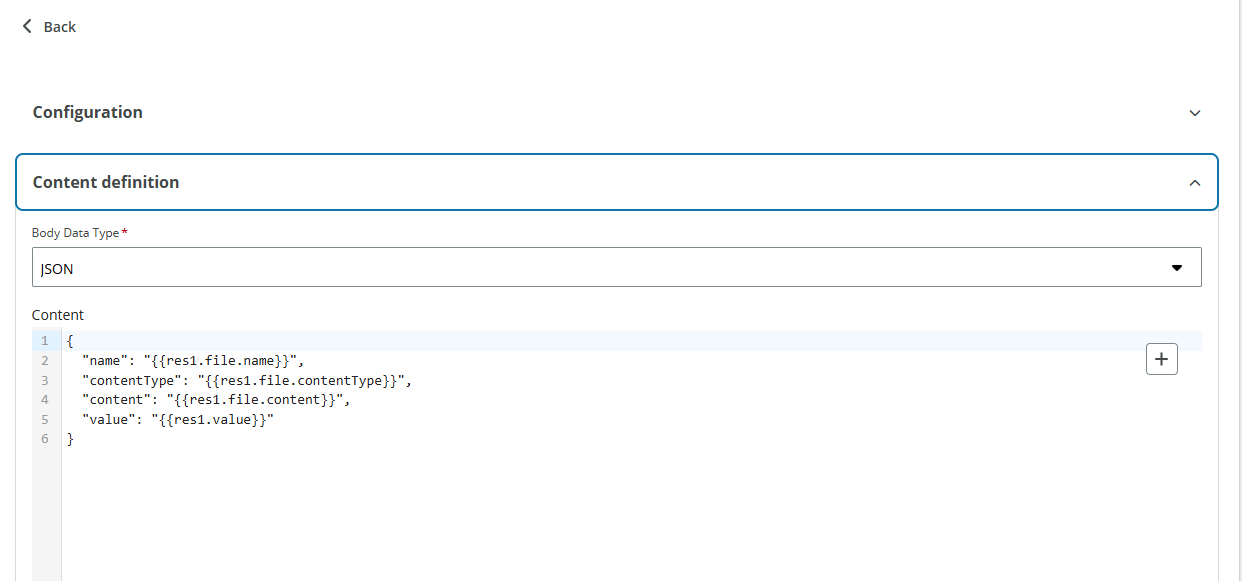
Form data: In the Content Definition section, in the Body data type drop-down, select Form data.
- Use File type: In the Type dropdown select File and then select the Resource with the file from the Content drop-down.
- Use Text type: In the Type dropdown select Text and then use Liquid to enter the file or select it using the Plus (+) button to open the Templating drop-down.
-
JSON: In the Content Definition section, in the Body data type drop-down, select JSON and reference the file using templating.
-