Liquid template language support
Overview
Liquid is an open-source template language that is used in many web applications to place dynamic content and modify data. All the Liquid API and syntax are fully supported in App Studio.
To learn more about Liquid, see the official Liquid documentation.
Categories
In Liquid, there are three types of code: objects, tags, and filters.
Objects
Objects are surrounded by matched pairs of curly braces {{ }}. They can be used in App Studio to show content. The objects resolve to the initial type of the field. For more information about Object Types in Liquid, see Liquid object types.
Here are a couple of object example outputs:
-
{{user.name}}This example results in a string. -
{{item.active}}This example results in a Boolean and it is not converted to a string.
Tags
Tags which do not resolve to text are surrounded by matched pairs of curly braces and percent signs {% and %}. They are used for logic operations and control flow for templates.
{% if res10.supplierId != blank %}Updated by {% endif %}
Note: The text surrounded by the curly brace percentage delimiters has no visible output when the template is rendered.
Filters
Filters change the output of a Liquid object or variable. They are used within double curly braces {{ }} and variable assignment, and are separated by a pipe character |, for example:
{{ user.name | upcase }}
App Studio
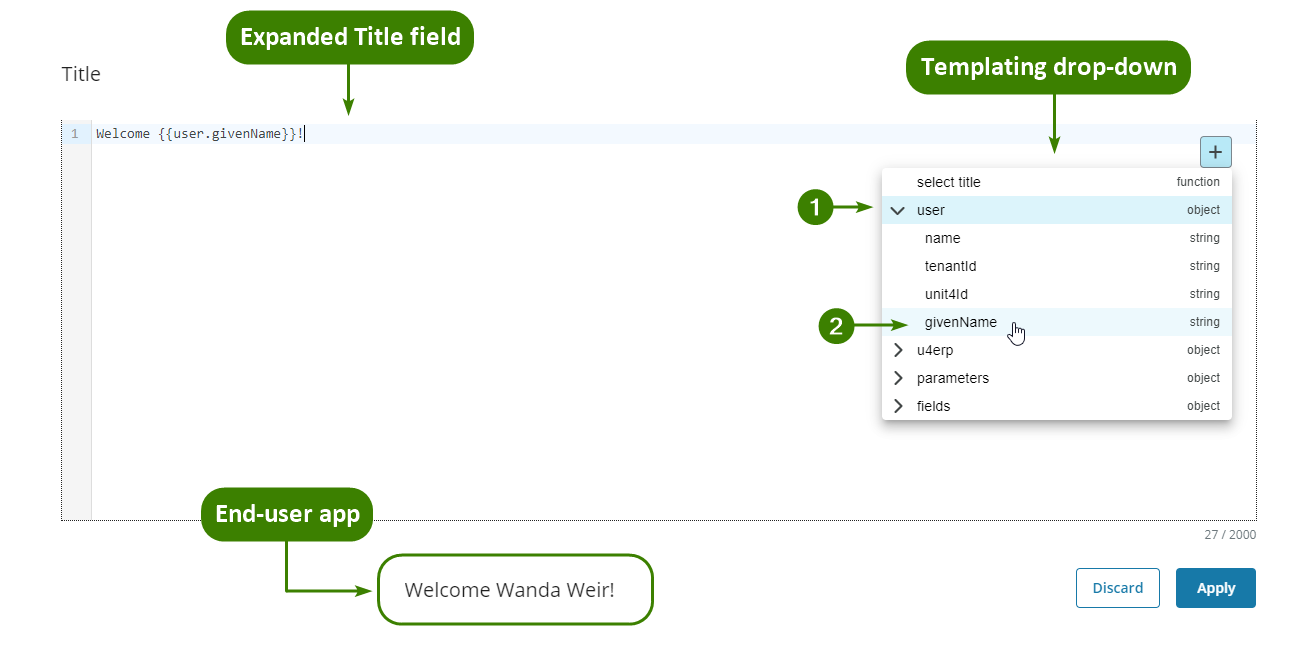
Templating drop-down
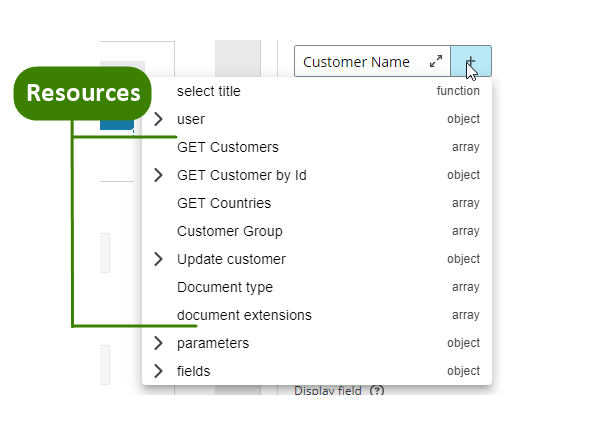
App Studio has a Templating drop-down to help you render content in different components using Liquid. Select the Plus (+) button to open the drop-down as shown in the image below.
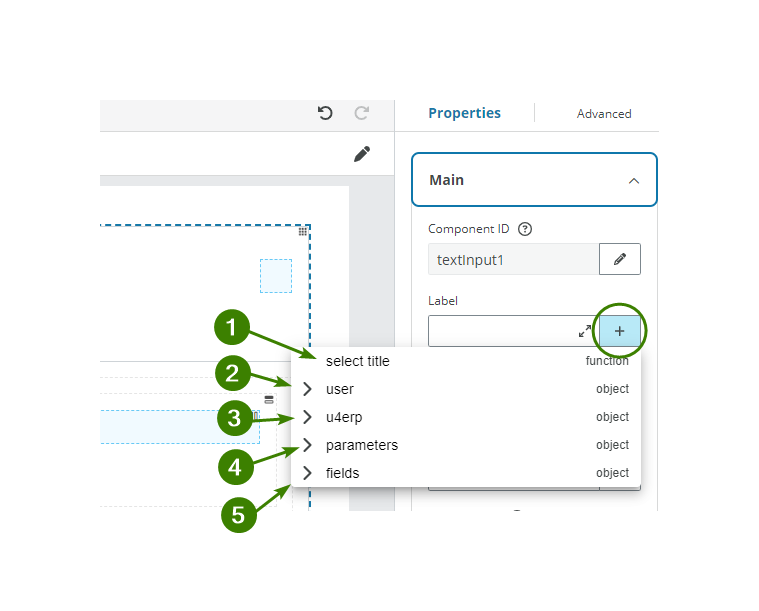
1. Select title
App Studio's APPSTUDIO_TITLES feature flag, supports predefined system titles. Titles for Standalone apps are displayed in the end-user’s browser language and in the established ERPx language for Business screen apps.
To add a title that you want to appear in the end-user app’s configured language, you can:
-
Option A: Write the title in the field if you know the Liquid formula.
-
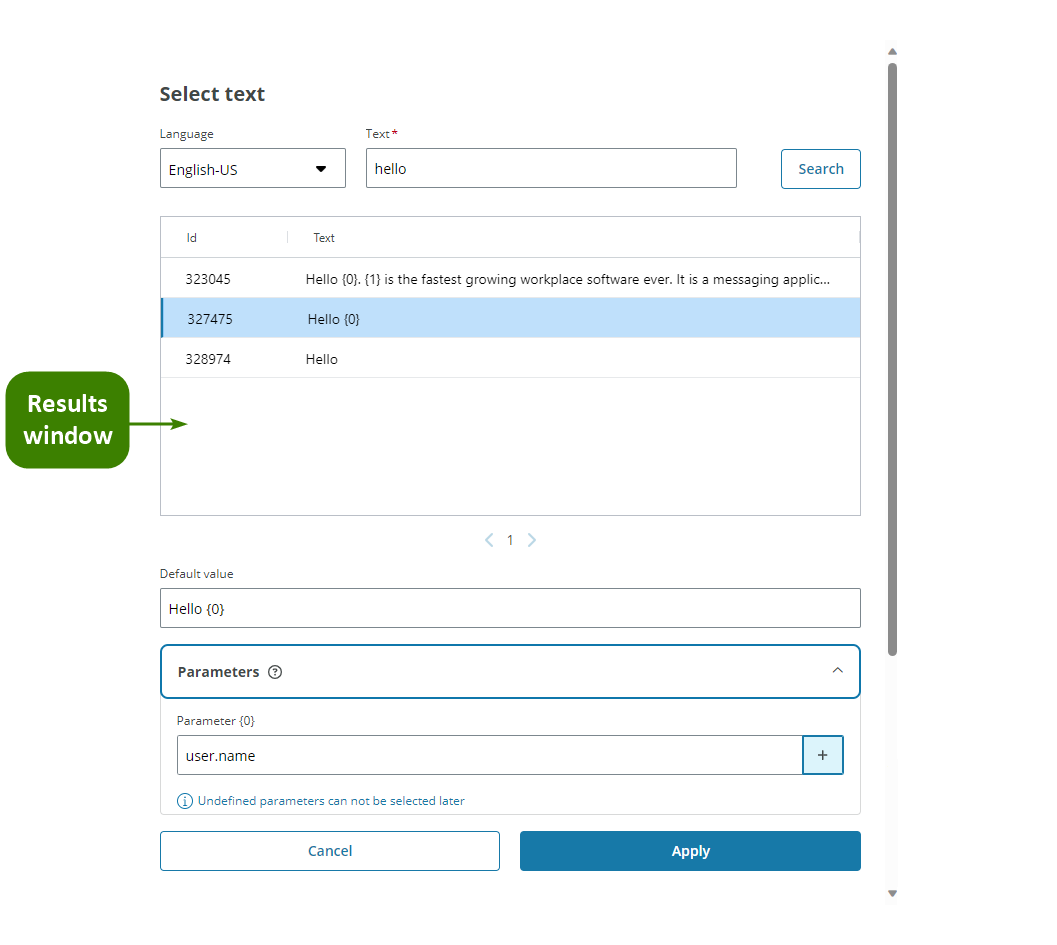
Option B: Open the Select title modal to search for the title by following these steps:
- Select the Plus (+) button to display the Templating drop-down.
- Select the Select title button to open the modal.
- Display the drop-down and choose the language you want to search in.
- Search for the title. You can search by writing text or the title’s ID number.
- Select the Search button.
- Choose and select the desired result from the results window.
- Edit the Default value. This text is shown in the end-user app if there is no translation for the targeted language. The field is pre-filled with your selection.
- Open the Parameters menu if available. Parameters are usually represented by
%sor{0}, where the letter and number change. You can use Liquid to enter the parameter or select a value from the Templating drop-down by selecting the Plus (+) button. For example:user.nameif you want the{0}parameter to be replaced with the user name. - Select Apply.
Note: The language in which you search for your title does not affect the output. The end-user sees the title in the language set in their browser or in ERPx.
2. User
The User drop-down allows you to select data from the user authenticated through Unit4 Identity Services (IDS) to reference in Liquid. You can also enter the value directly in Liquid if you know the formula by typing {{user.valueName}}.
3. U4erp
The u4erp drop-down entry allows you to retrieve the user ID and the company (clientid) for users who have logged in to ERPx, and reference them in Liquid. You can also enter the value directly in Liquid if you know the formula by typing {{u4erp.valueName}}.
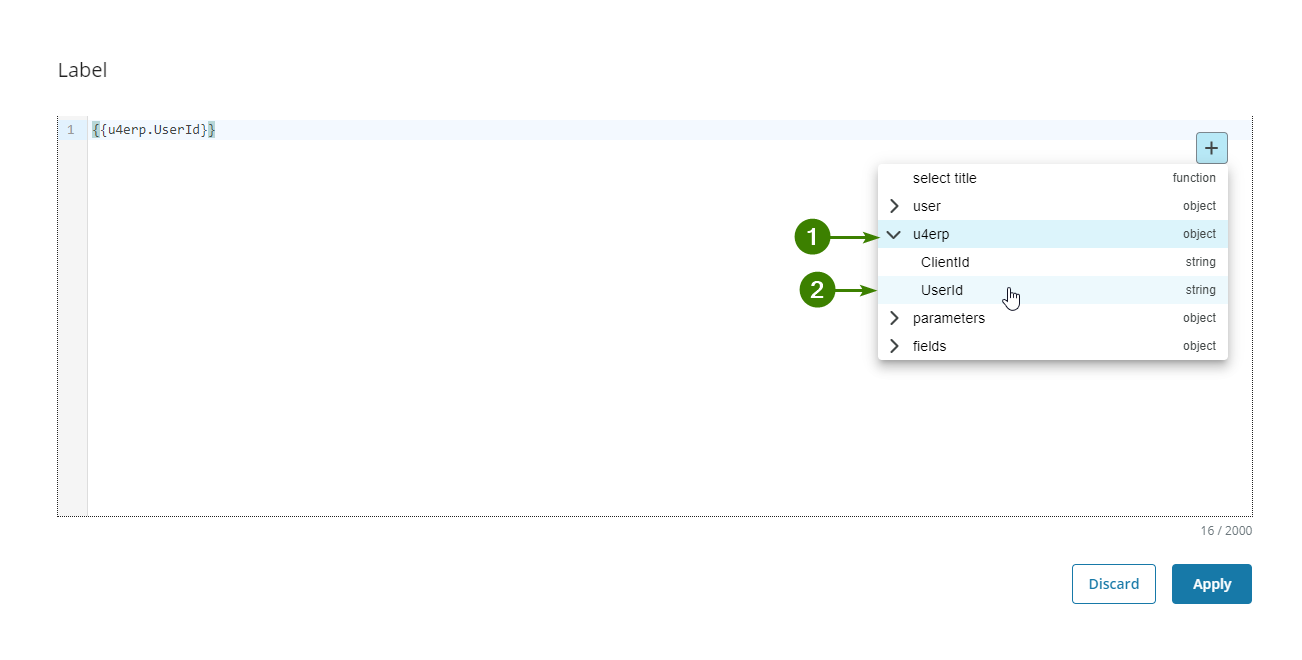
Note: The value will only be rendered in the end-user app for Business screen apps (ERPx apps).
4. Parameters
Standard Extension Kit parameters are supported in component properties. You can use Liquid to allow values used across apps and flows to be referenced as parameters.
The Parameters drop-down allows you to select a parameter from the list of available ones. You can also reference the parameters directly using Liquid by typing {{parameters.parameterName}}. These properties are defined in the Parameters section in the Extension Kit main menu. See Parameters for more details.
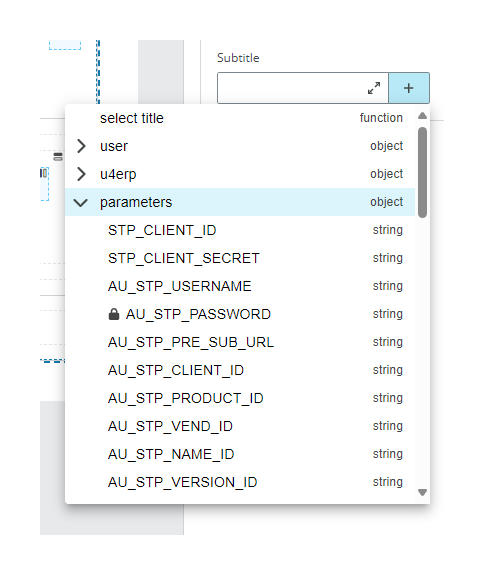
When you hover the cursor over a parameter its value is displayed. Sensitive parameters are displayed as locked and their values are not shown.
Parameters are resolved when rendering the app. If a parameter is not defined, an empty value is shown in the end-user app, and if the parameter is sensitive, it is not shown and the Liquid formula is displayed.
Note: When you import an app, all parameters' references are also imported and you must verify that they are still valid in the imported app.
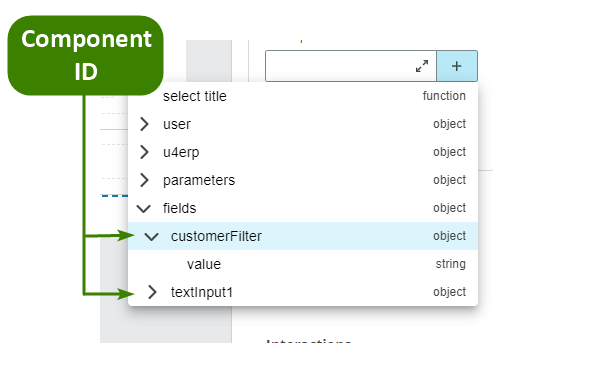
5. Fields
The Fields drop-down allows you to select the data the user has entered in the components to reference in Liquid. You can also reference them directly using Liquid by typing{{componentID.valueName}}.
To search for the value you want, open the drop-down and search for the Component ID drop-down. Open it and select value which corresponds with the data the user has entered in the field.
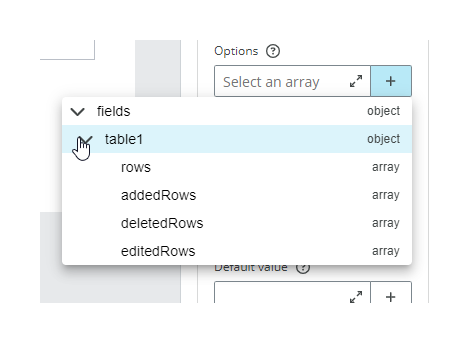
Component fields that only allow you to select arrays work differently:
- In the Table component you can choose between all rows, added rows, deleted rows or edited rows.
- In the Select component, in the Options field, only arrays, if any, are available.
Note: All the resources that you configure and have fields available to reference with Liquid, appear in the Templating drop-down, under the User drop-down.
App Studio quick tips
App Studio allows templating in Liquid. Templating term refers to using Liquid language to render dynamic content in the end-user app.
In this section you can find quick tips for:
- Adding rules to trigger component properties, like Hidden or Read only.
- Using data from the Table component.
- Adding a filter to a component.
- Avoiding unwanted line breaks.
- Using tags to display a message.
Add rules to trigger properties
The Properties section of a component allows you to set rules to trigger some of the properties, such as Hidden, Disabled or Read only Interactions or the Required field Validation.
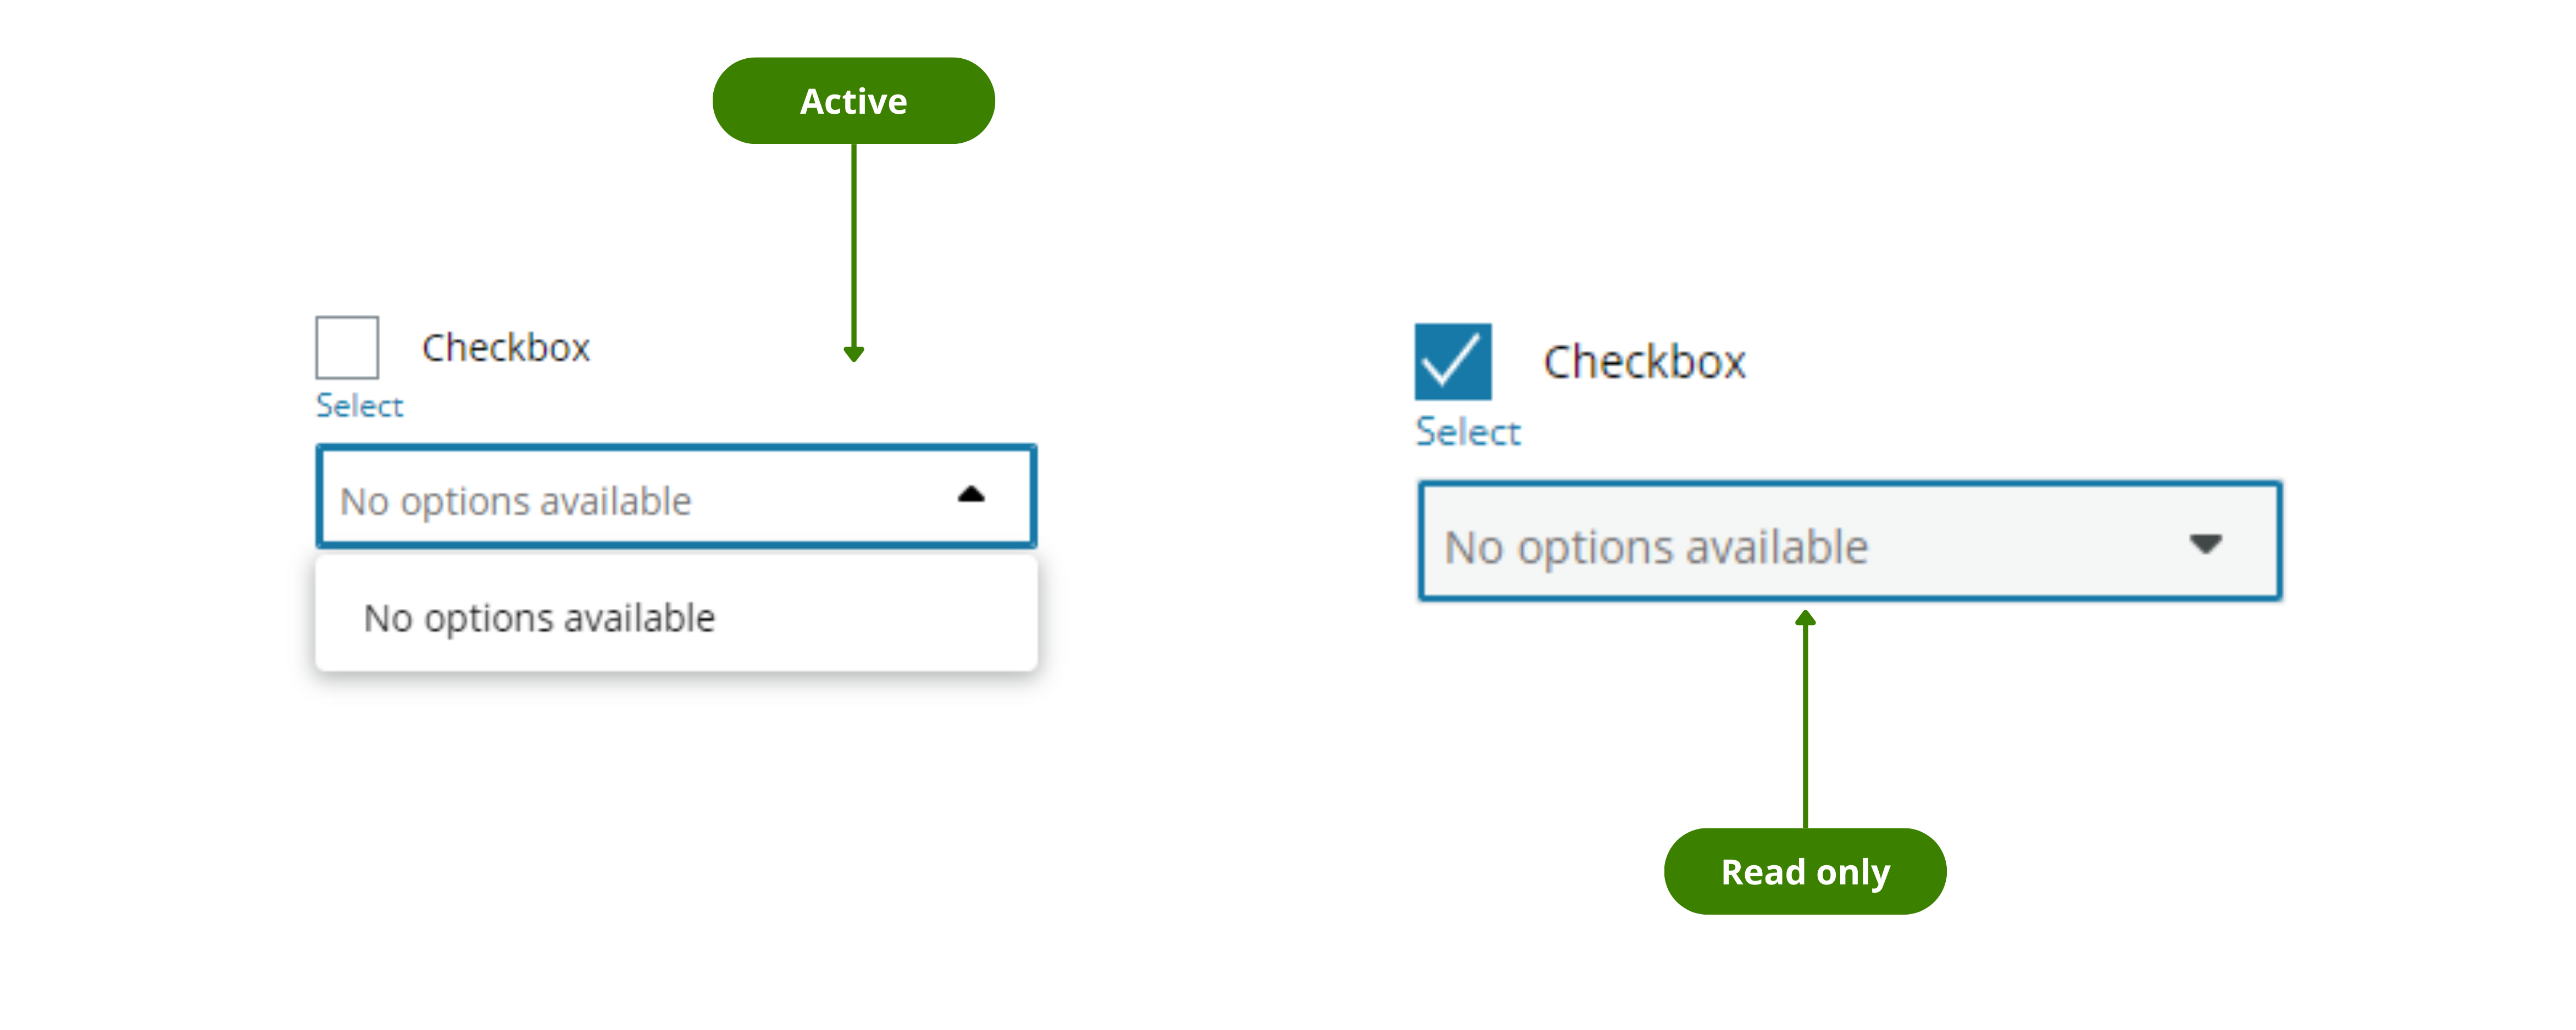
Here is a quick tip to set any of them using Read only as an example:
- Go to the Interactions section in your component. This example uses the Select component.
- Select the Read only checkbox.
- Enter the Liquid code
{{checkbox1.value == true}}in the Rule field, wherecheckbox1is the Component ID of the component that will trigger the property, in this case the Checkbox component.
In this example the component will be Read only only when the rule is fulfilled. Now, when the Checkbox component value matches the rule (in this case, when the checkbox is selected), the rule returns as valid (true). This triggers the rule, setting the component to Read only, in this example a Select component.
Use data from the Table component
You can use Liquid to use data from your resources or to use data from your components.
Get specific data from the Table component
Here is a quick tip if the data you need is a specific cell value of the Table component:
-
Enter
{{tableId.rows[3].columnID}}in the component field.-
tableIdspecifies the table that you want to retrieve data from and is the Component ID of the table component. -
rows[3]specifies the row within the table, where the number corresponds to the array position. Note that in Liquid arrays, counting starts from 0. -
columnIDspecifies the column of the Table component and is the Column ID of the column.
-
Get all data from the Table component
Here is a quick tip if you want to get all the data from your Table component in JSON format:
-
Enter
{{tableId.rows | json}}in the component field.-
tableIdspecifies the table that you want to retrieve data from and is the Component ID of the Table component. -
rowsall the rows from the Table component. -
jsonspecifies the format in which you want to retrieve the data.
-
POST the Table component data using the HTTP resource
Here is a quick tip to serialise the data of your Table component to send them in JSON format:
-
Go to your HTTP resource.
-
Enter
{{tableId.rows | json}}in the Content definition (following JSON format).-
tableIdspecifies the table that you want to retrieve data from and is the Component ID of the Table component. -
rowsall the rows from the Table component. You can select other options likedeletedrows. -
jsonspecifies the format in which you want to retrieve the data.
-
Do operations with columns in the Table component
Here is a quick tip if you want to have a column that shows the result of an operation between two other columns in the Table component:
-
Open the Column menu of the column you want to show the result.
-
To multiply the value of two columns, enter
{{propertyName | times:porpertyName}}in the Column data field.porpertyNamespecifies which properties of the resource array we want to use for the operation. Typically, the value entered in the Column data field of each row that we want to operate with. For example,{{Price | times:Qty}}. You can use the Templating drop-down to search for the properties.
To see what operations you can perform, see Liquid filters.
Note: This tip works only on non-editable Table components.
Add a filter to a component
Here is a quick tip if you want to filter data from an array in your resources. This example has two components, where the second component filters data according to the value of the first.
-
Enter
{{res1 | where: 'propertyName', my1Component.value}}in the field of your second component.-
res1specifies the resource array that you want to filter data from and is the default name given to the resource. -
propertyNamespecifies in which property from the resource array we want to filter. -
my1Component.valueis the value we want to filter, wheremy1Componentis the Component ID of the first component.
-
Avoid unwanted line breaks
Here is a quick tip to avoid unwanted line breaks caused by indentation in your Liquid formula.
There are three ways to avoid them:
- Write the formula in one line.
- Use hyphens in your tag syntax to eliminate left and right whitespaces. For example:
{% assign currentYear= "now" | date: "%Y" -%}This will eliminate the right whitespace. See Liquid documentation for more details. - Use the filter
| strip_newlines. See Liquid documentation for more details.
Use tags to display a message
Here is a quick tip if you want to use a Liquid tag to display a message.
- If Supplier is not selected (blank) no information is displayed.
- If a Supplier is selected (not blank) the message appears (updated by). Also, for this example a filter to format the date is used.
{% if res10.supplierId != blank %}Updated by {% endif %}
{% if res10.supplierId != blank %}{{res10.lastUpdated.updatedBy}}{% endif %}
{% if res10.supplierId != blank %}, {{res10.lastUpdated.updatedAt | date: "%m/%d/%Y %H:%M" }} (User time zone) {% endif %}
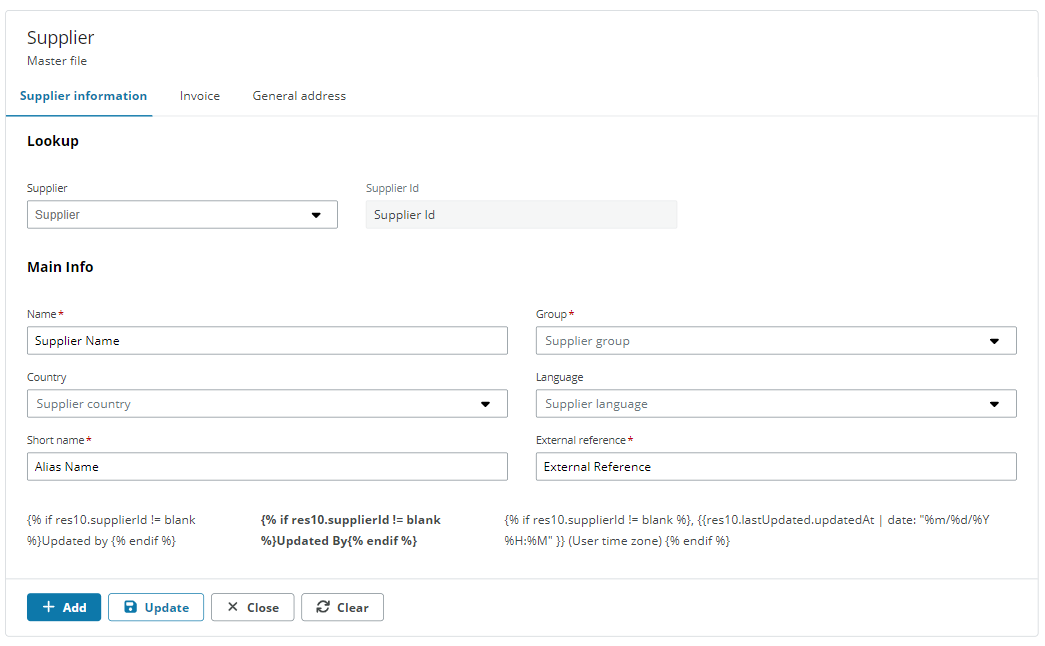
and here is a preview of the end-user app: