Configure an app to use ERPx API resources
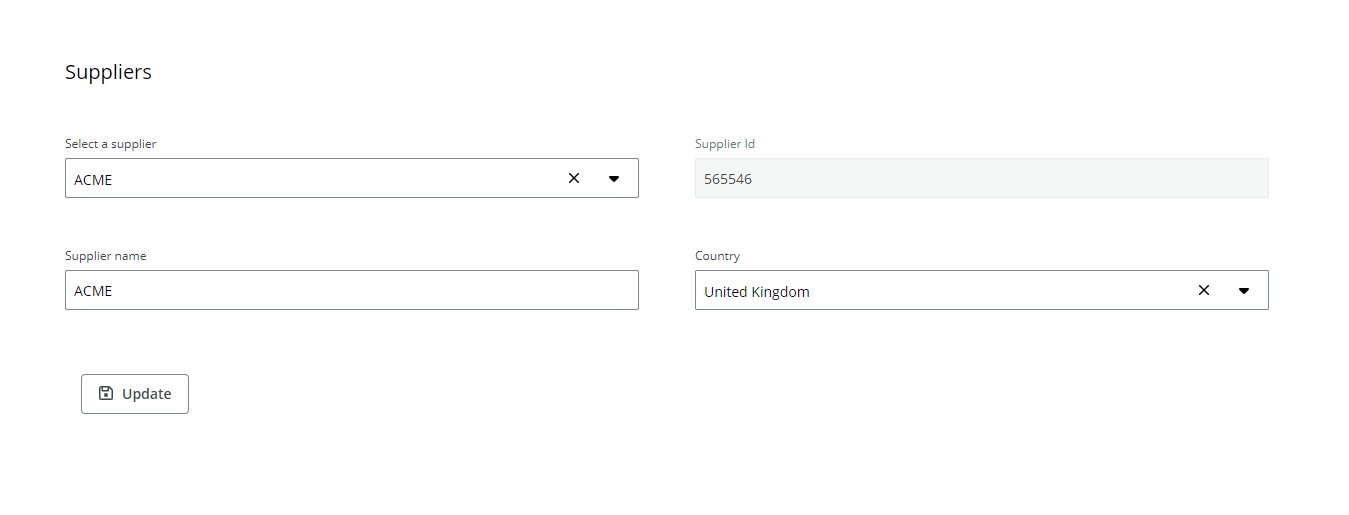
This example shows how to configure an app where the user can:
- Select a supplier from a dropdown.
- See the ID of the selected supplier.
- See, edit and update the name and country of the selected supplier.
All the data is retrieved and updated using the ERPx API resource.
Warning: For the ERPx API resource to work properly in the end-user app, the user must have access to the ERPx Public APIs and to the specific endpoints you have used. Go to the Public API access (XAG005) window to check your user's configuration.
To start:
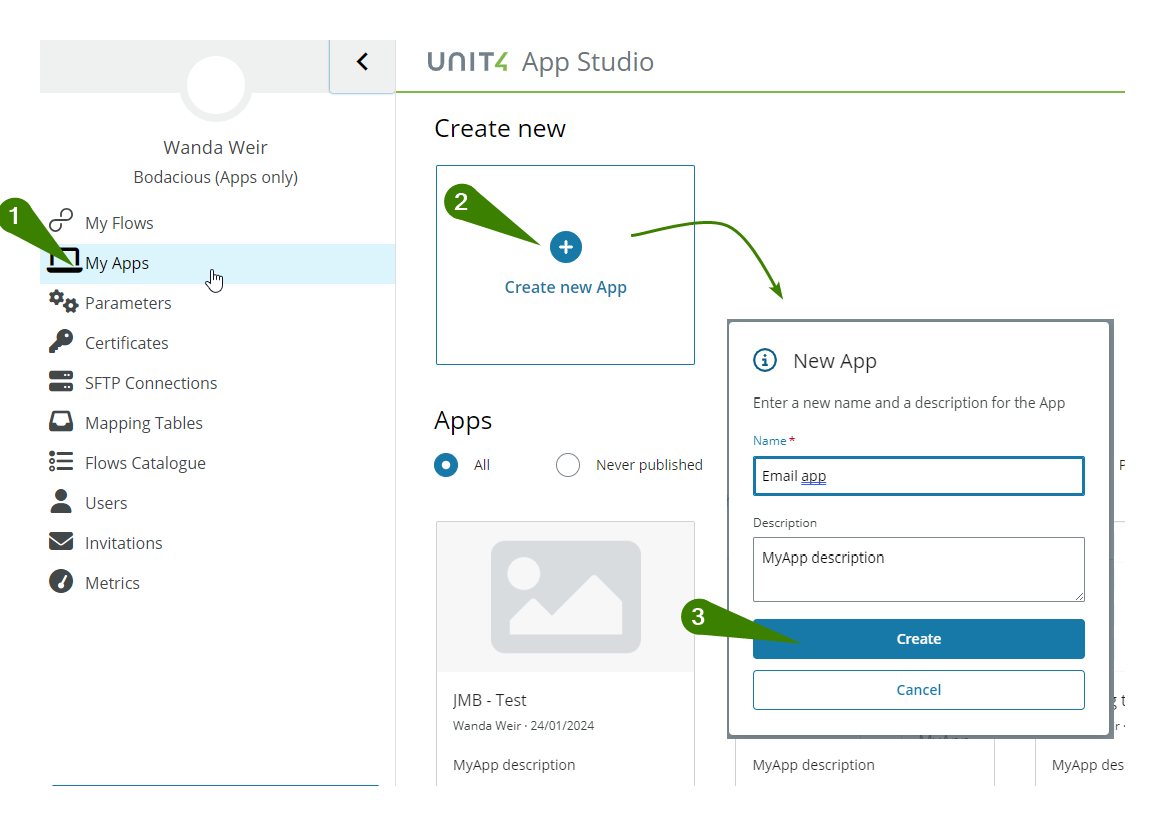
- Select My Apps from the Extension Kit portal main menu.
- Select the Create new app button and name your app.
- Select the Create button.
Configure the app layout
IMPORTANT: The components and resources have dependencies between them. To configure this app, you must go from the Canvas tab to the Resources tab and the Logic flow tab frequently.
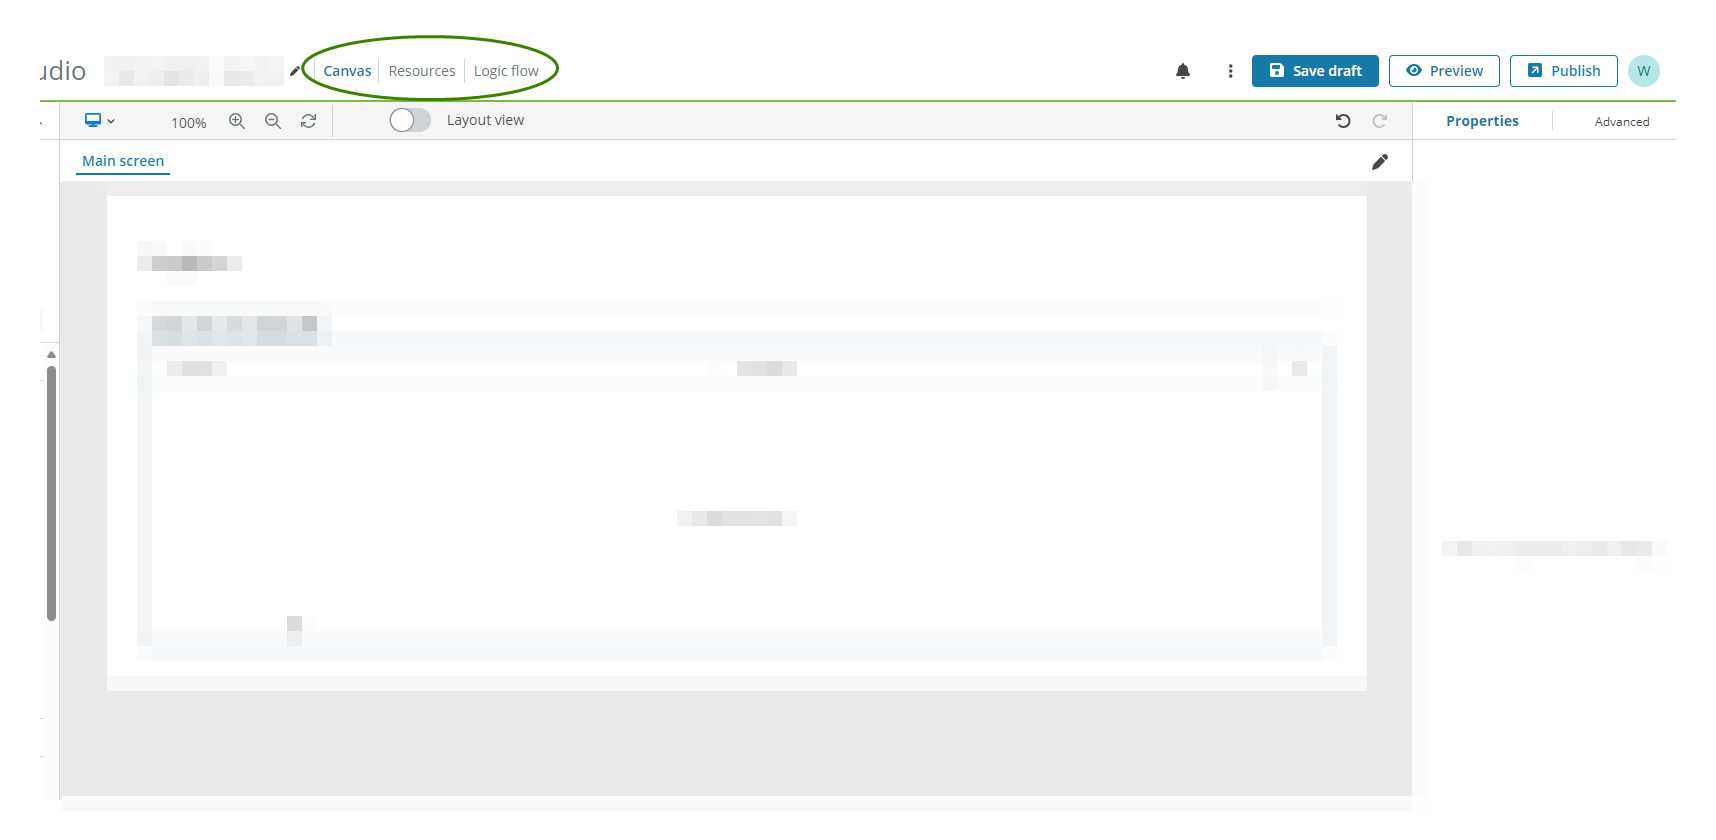
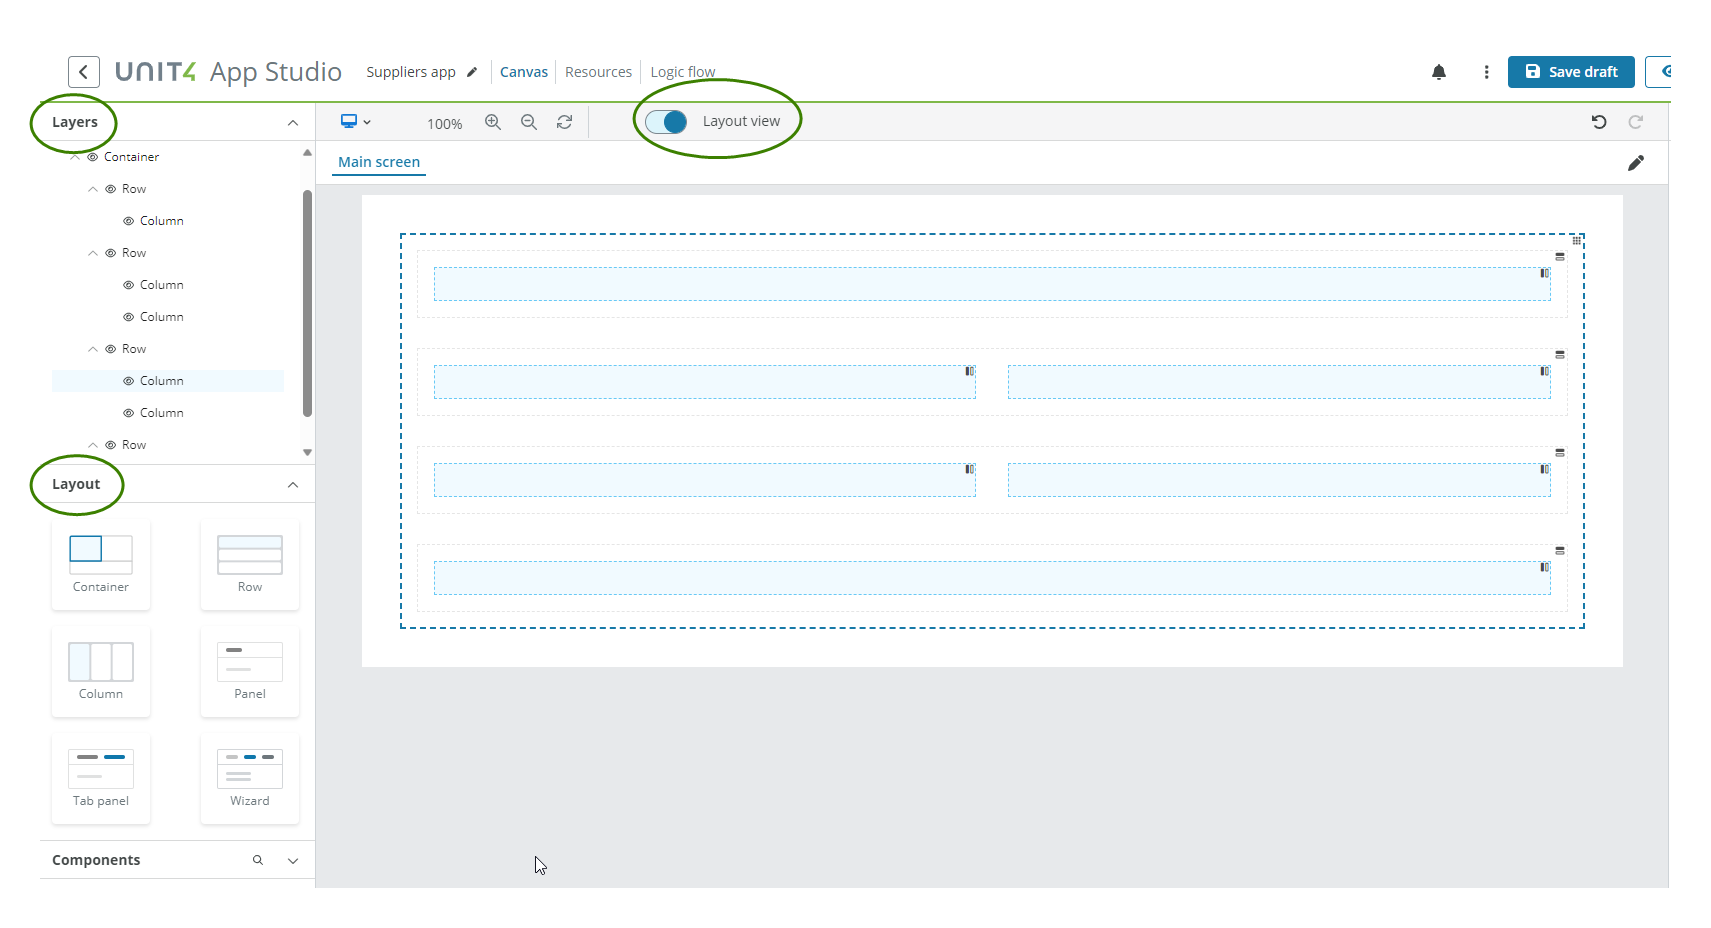
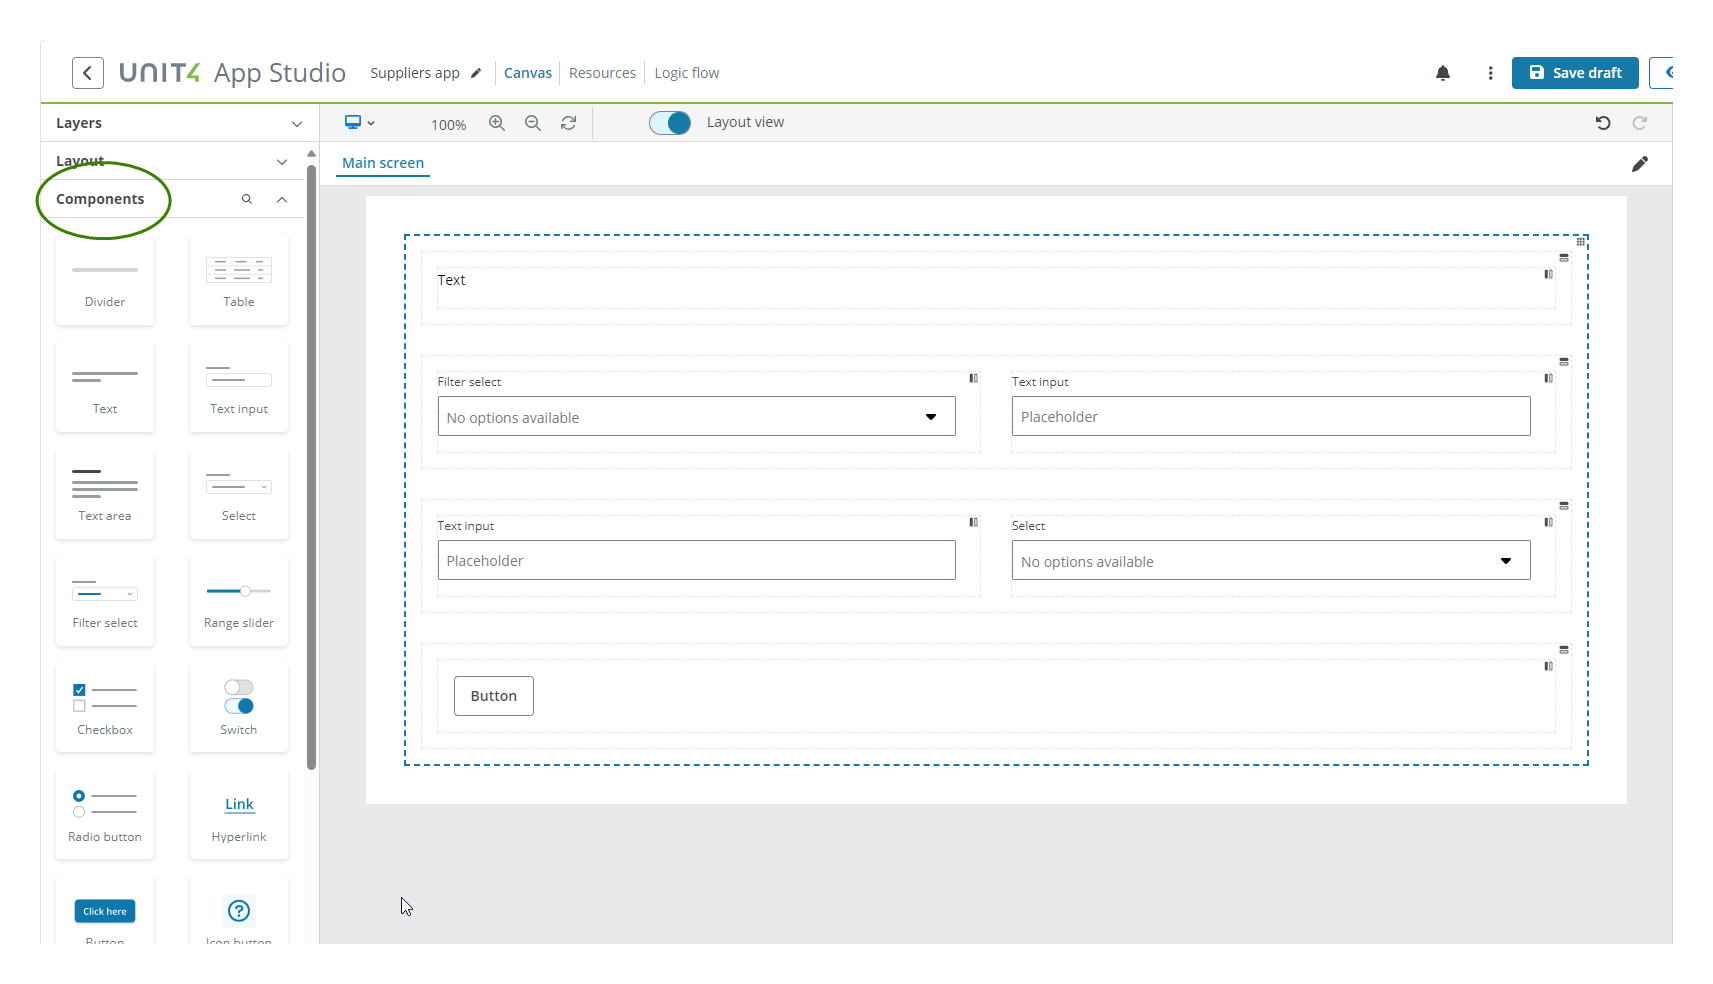
Go to the Canvas tab:
- Drag and drop the Layout components to the canvas. In this example we added the following components in this order:
- One container
- Four rows inside the container
- One column in the first and last row
- Two columns in the second and third row
Note: Use the Layout view switch and the Layer panel to help you.
-
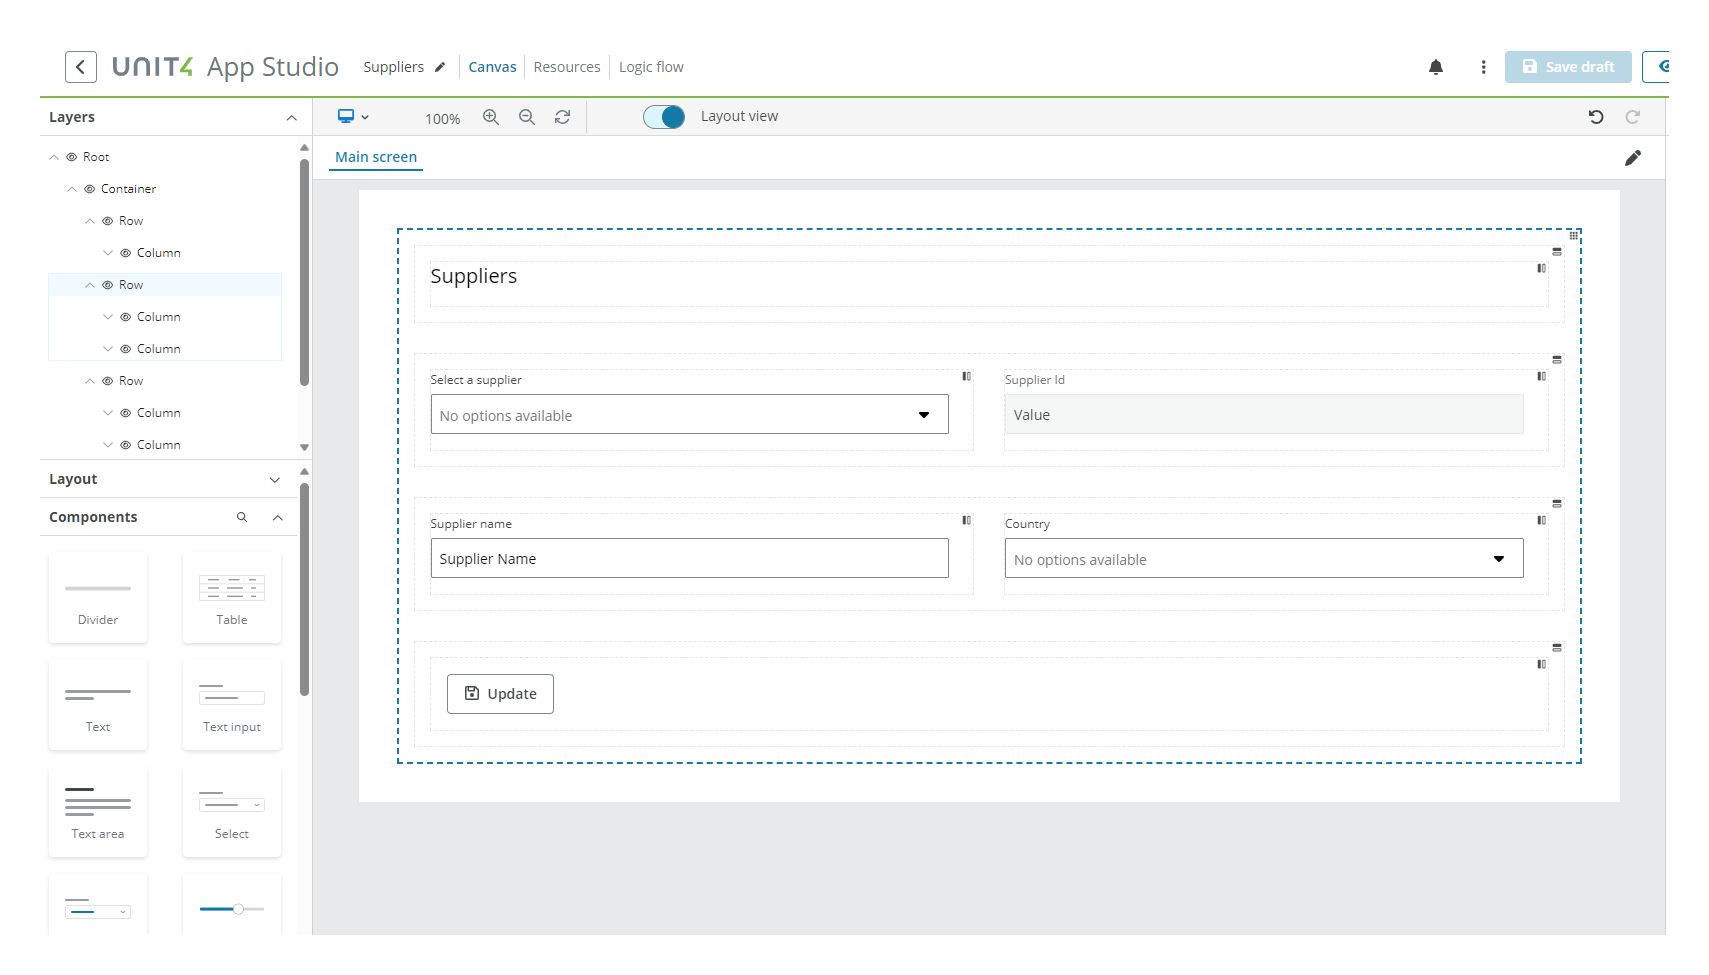
Drag and drop the following components inside the Layout components, as shown in the image:
- One Text component
- One Filter select component
- Two Text input components
- One Select component
- One Button component
Configure the Text component
In this example we configure the component as follows:
- Select the Text component in the canvas and go to the Properties panel.
- Open the Main menu and configure:
- Text: Enter the text: Suppliers.
- Open the Styles menu and configure:
- Format: Select Title from the dropdown.
- Open the Main menu and configure:
Go to the Resources tab next to canvas:
After setting our UI, let's configure our first resource to retrieve supplier data:
Create the Suppliers GET resource
To configure the resource, follow these steps:
- Select the Plus (+) button on top of the left panel to create a new resource.
- Select the new resource on the left panel.
- Select the Pencil icon to change the name to 'Suppliers- GET'
-
Select ERPx API from the Type menu on the right and configure:
-
Configuration section: - API endpoint: Open the dropdown and select
objects/suppliers- Method: Open the dropdown and select GET. -
Parameters section: - orderBy: Enter the text: supplierName.
-
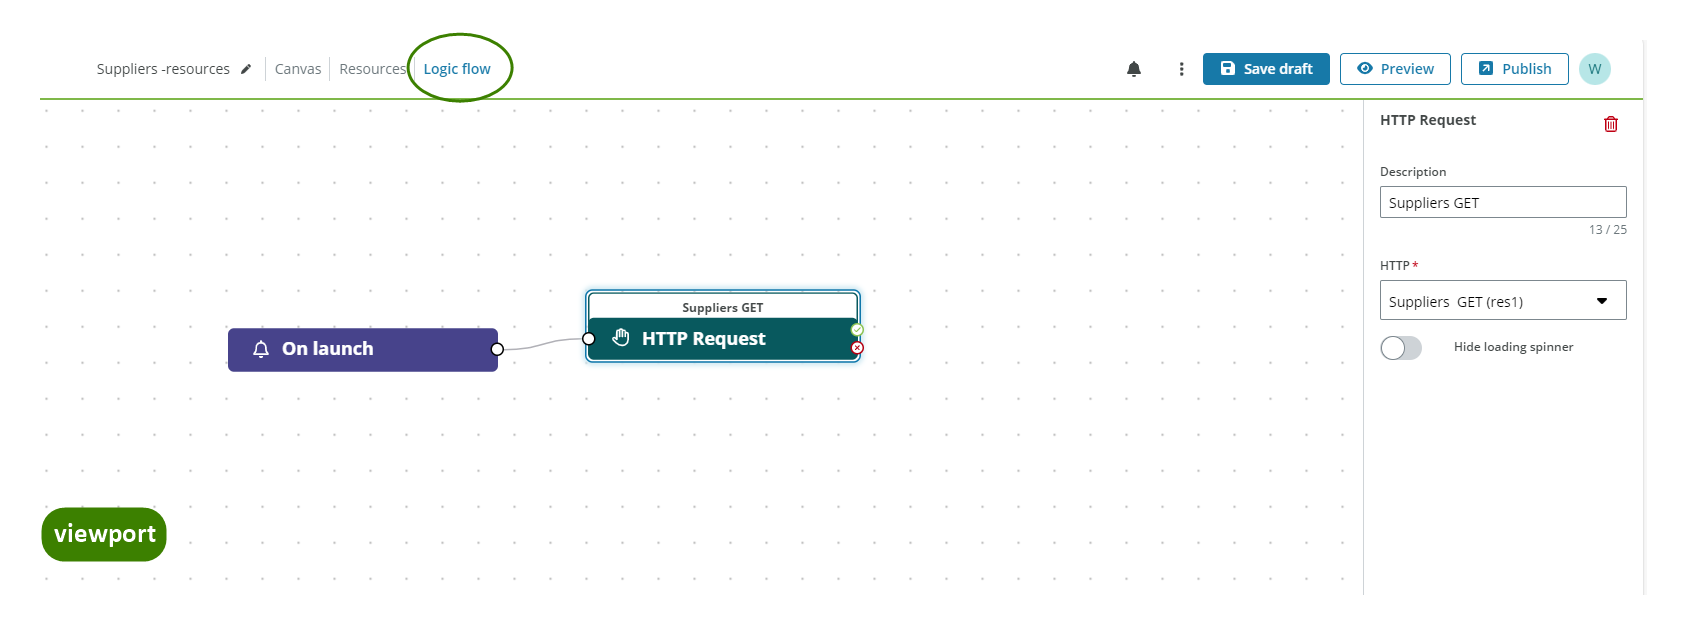
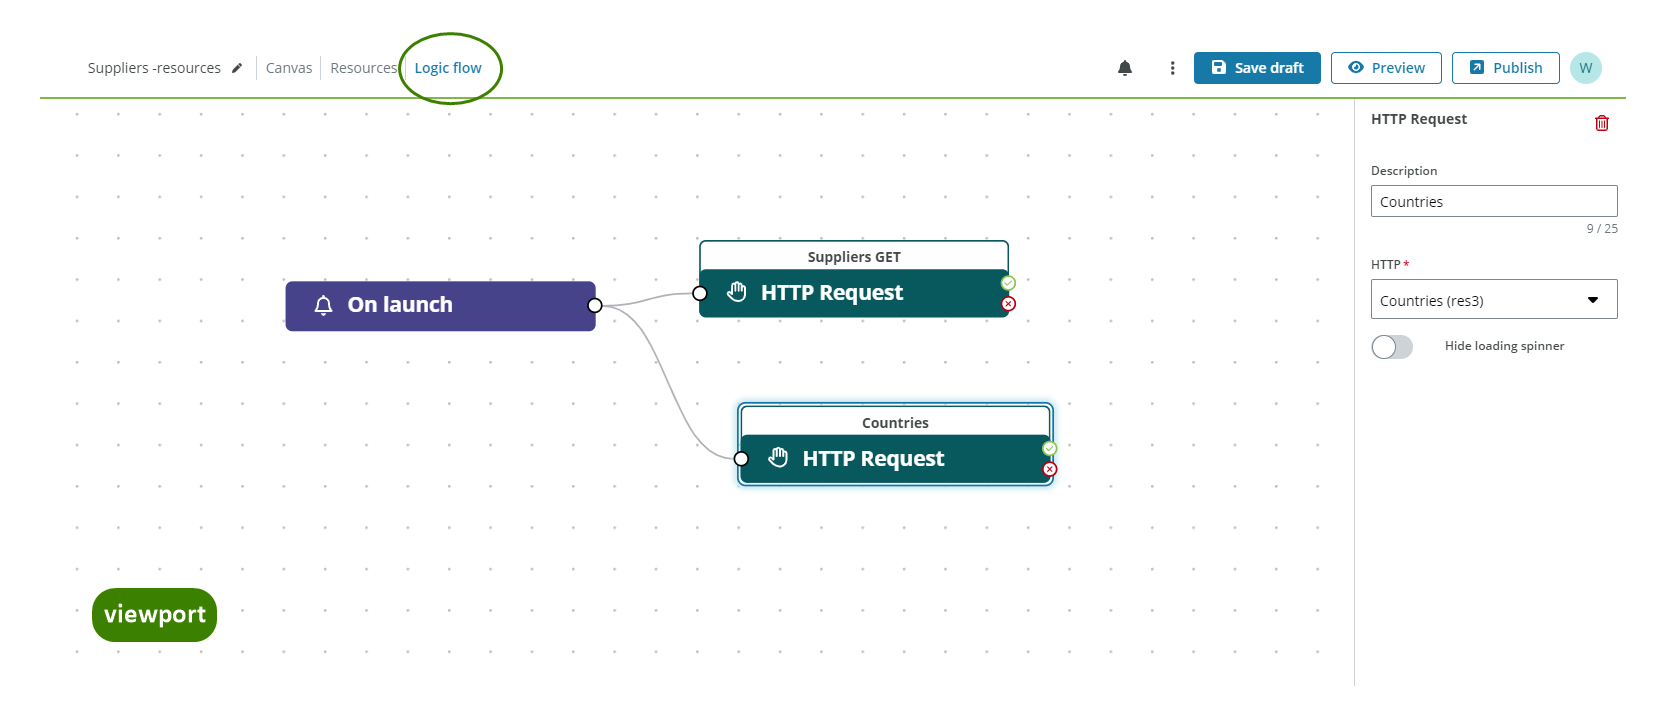
Go to the Logic flow tab next to resources:
To trigger the resource when the app is launched, follow these steps:
- Drag the On launch event to the viewport.
- Drag the HTTP Request action to the viewport and connect it to the On launch event.
- Select HTTP Request action in the viewport to see the properties panel to the right.
- Open the HTTP dropdown.
-
Select the resource, for this example Suppliers GET(res1).
Go back to the Canvas tab:
Now, we need to continue configuring some of our components.
Configure the Filter select component
In this example we configure the component as follows:
- Select the Filter select component in the canvas and go to the Properties panel.
-
Open the Main menu and configure:
- Component ID: Select the Edit button and enter 'supplierfilter' and select the Save button.
- Label: Enter the text: Select a supplier.
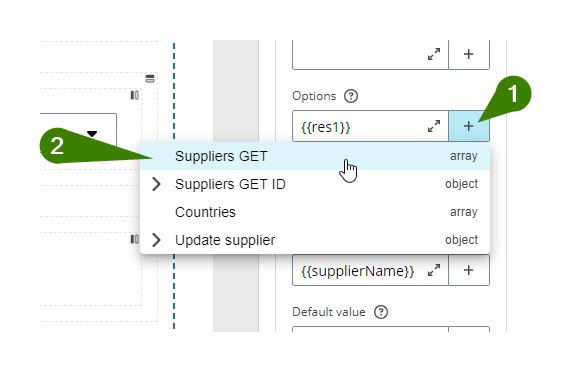
- Options: Enter
{{res1}}or use the Plus (+) button to display the Templating dropdown to select the Supplier GET resource.
- Value field: Enter
{{supplierId}}or use the Plus (+) button to display the Templating dropdown to select the supplierId property. - Display field: Enter
{{supplierName}}or use the Plus (+) button to display the Templating dropdown to select the supplierName property.
-
Go back to the Resources tab:
Let's create our second and third resources.
Create the Suppliers GET-ID resource
To configure the resource, follow these steps:
- Select the Plus (+) button on top of the left panel to create a new resource.
- Select the new resource on the left panel.
- Select the Pencil icon to change the name to 'Suppliers GET-ID'
-
Select ERPx API from the Type menu on the right and configure:
-
Configuration section: - API endpoint: Open the dropdown and select
suppliers/{supplierId}- Method: Open the dropdown and select GET. -
Parameters section: - supplierId: Enter
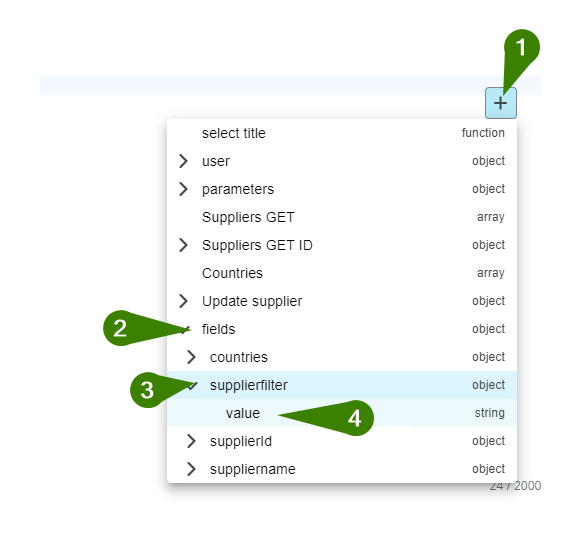
{{supplierfilter.value}}or use the Plus (+) button to display the Templating dropdown to navigate to the value of the supplierfilter component like this: Plus(+) button --> fields --> supplierfilter --> value.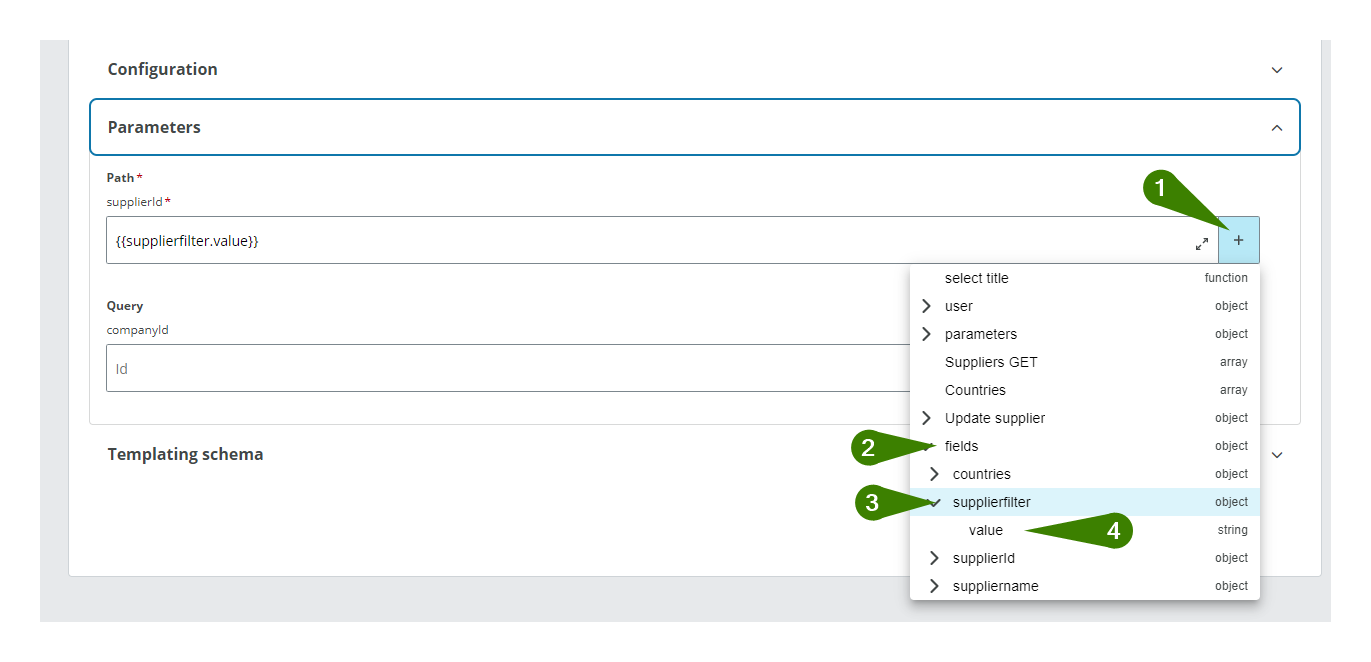
-
Note: ERPx API resources that use the GET method and have dependencies (Liquid in URL, parameters, headers) do not need to be configured in the Logic map or the Logic flow. The call is made through use of the component that is referenced.
Create the Countries resource
To configure the resource, follow these steps:
- Select the Plus (+) button on top of the left panel to create a new resource.
- Select the new resource on the left panel.
- Select the Pencil icon to change the name to 'Countries'
-
Select ERPx API from the Type menu on the right and configure:
-
Configuration section: - API endpoint: Open the dropdown and select
objects/countries- Method: Open the dropdown and select GET. -
Parameters section: - filter: Enter the text: language eq 'EN'. - orderBy: Enter the text: countryName.
-
Go to the Logic flow tab next to resources:
To trigger the resource when the app is launched, follow these steps:
- Drag the HTTP Request action to the viewport and connect it to the On launch event.
- Select HTTP Request action in the viewport to see the properties panel to the right.
- Open the HTTP dropdown.
-
Select the resource, for this example Countries (res3).
Go back to the Canvas tab:
Let's continue with some more components.
Configure the Text input component
In this example we configure the components as follows:
Configure the Supplier ID text input
-
Select the first Text input component to use for the supplier ID in the canvas and go to the Properties panel.
-
Open the Main menu and configure:
- Component ID: Select the Edit button and enter 'supplierId' and select the Save button.
- Label: Enter the text: Supplier Id.
- Default value: Enter
{{supplierfilter.value}}or use or use the Plus (+) button to display the Templating dropdown, open the fields menu, look for the supplierfilter component, open it and select value.
Note: We have configured the value of this component to be the supplier Id when configuring the Filter select component.
-
Open the Interactions menu and configure:
- Select the Read only checkbox.
-
Configure the Supplier name text input
- Select the second Text input component to use for the supplier name in the canvas and go to the Properties panel.
- Open the Main menu and configure:
- Component ID: Select the Edit button and enter 'suppliername' and select the Save button.
- Label: Enter the text: Supplier name.
- Default value: Enter
{{res2.supplierName}}or use the Plus (+) button to display the Templating dropdown to open the Supplier GET-ID resource and select the supplierName property .
- Open the Main menu and configure:
Configure the Select component
In this example we configure the components as follows:
- Select the Select component in the canvas and go to the Properties panel.
- Open the Main menu and configure:
- Component ID: Select the Edit button and enter 'countries' and select the Save button.
- Label: Enter the text: Country.
- Options: Enter
{{res3}}or use the Plus (+) button to display the Templating dropdown to select the Countries resource. - Value field: Enter
{{countryCode}}or use the Plus (+) button to display the Templating dropdown to select the countryCode property. - Display field: Enter
{{countryName}}or use the Plus (+) button to display the Templating dropdown to select the countryName property. - Default value: Enter
{{res2.countryCode}}or use the Plus (+) button to display the Templating dropdown to find the Supplier GET-ID resource and select the countryCode property.
- Open the Main menu and configure:
Go back to the Resources tab:
Now, we will configure the last resource for our app.
Create the Update supplier resource
To configure the resource, follow these steps:
- Select the Plus (+) button on top of the left panel to create a new resource.
- Select the new resource on the left panel.
- Select the Pencil icon to change the name to 'Update suppliers'.
-
Select ERPx API from the Type menu on the right and configure:
-
Configuration section:
- API endpoint: Open the dropdown and select
suppliers/{suppliersId} - Method: Open the dropdown and select PATCH.
- API endpoint: Open the dropdown and select
-
Parameters section:
- supplierId: Enter
{{res2.supplierId}}or use the Plus (+) button to display the Templating dropdown to open the Suppliers GET ID resource and to navigate to the supplierId property.
- supplierId: Enter
-
Content definition section:
- Body Data Type: Select JSON from dropdown.
- Content: Enter the JSON. For this example, you can copy and paste the JSON below.
Note: You can enter value property with Liquid or using the Plus (+) button to display the Templating dropdown to navigate to the component's value through the fields menu.
[{"op": "replace","path": "/supplierName", "value": "{{suppliername.value}}" }, { "op": "replace","path": "/countryCode","value": "{{countries.value}}" }]
-
Note: This resource is triggered in the Logic map in the Button component. See Button component.
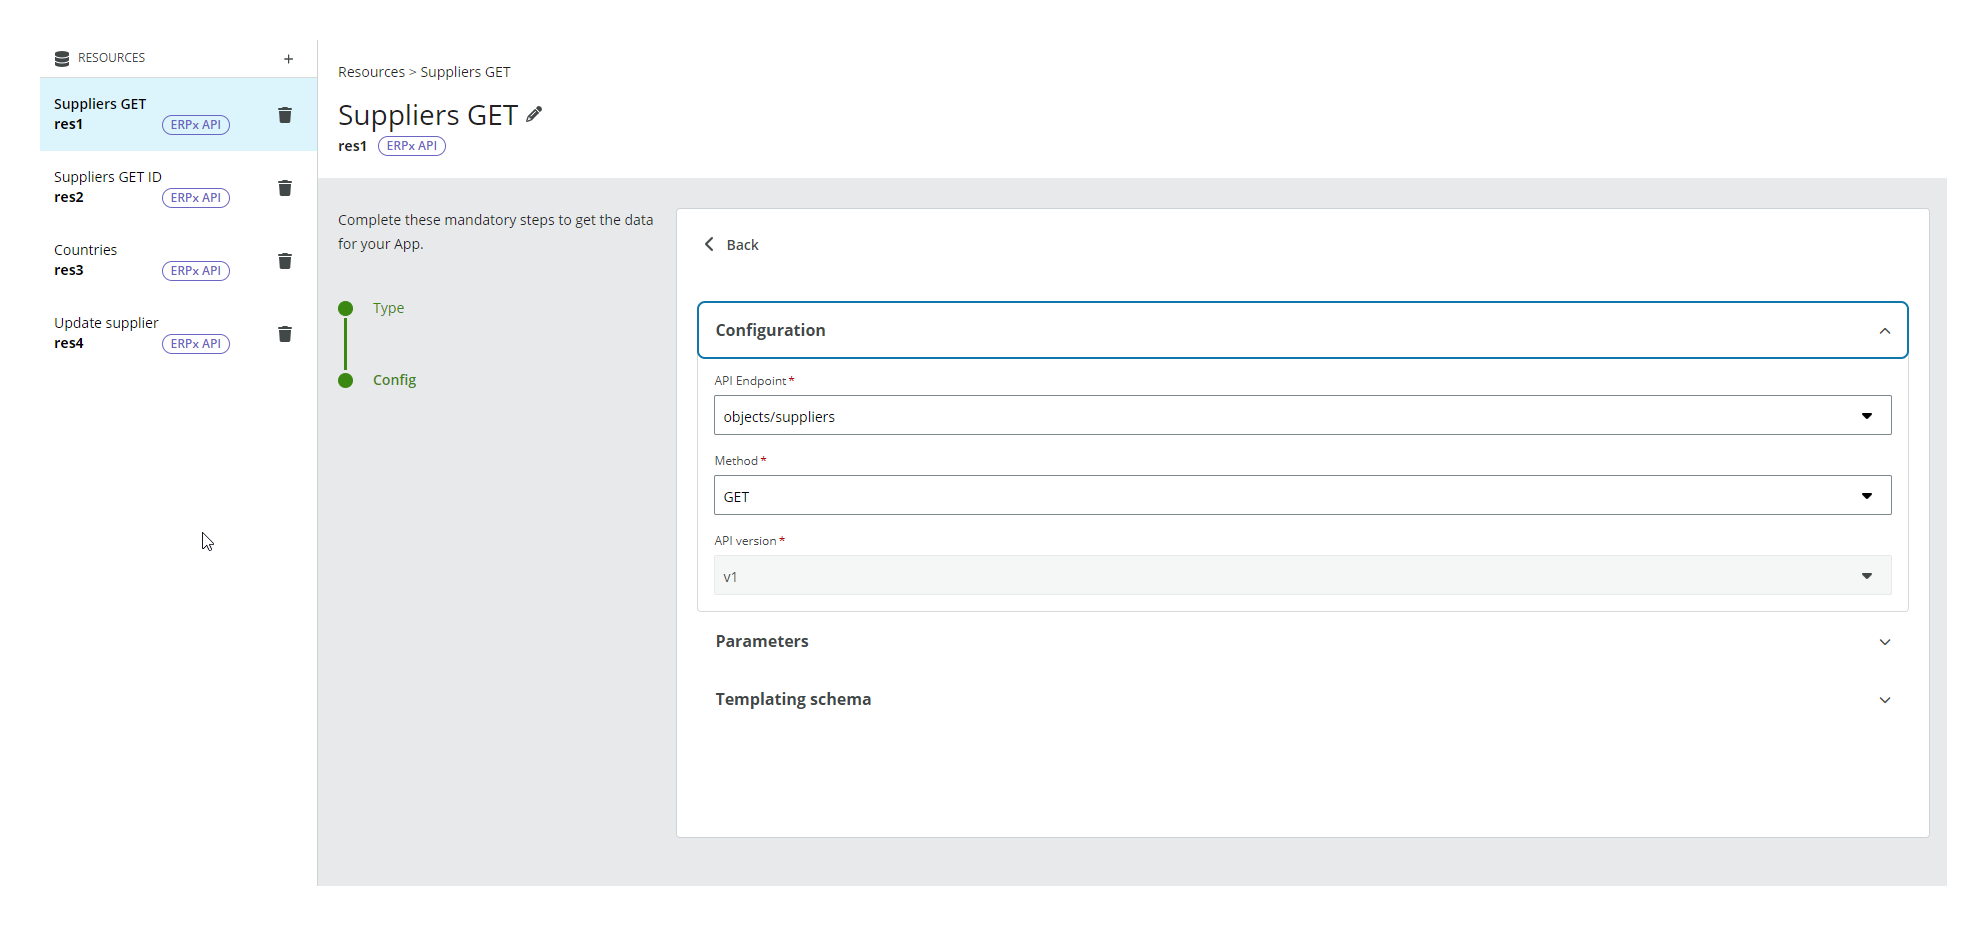
In the following image you can see the Resource tab with all the ERPx resources.
Go back to the Canvas tab:
Let's configure our last component.
Configure the Button component
In this example we configure the components as follows:
-
Select the Button component in the canvas and go to the Properties panel.
-
Open the Main menu and configure:
- Text: Enter the text: Update.
-
Open the Styles menu and configure:
- Icon: Select the Save icon from the dropdown.
-
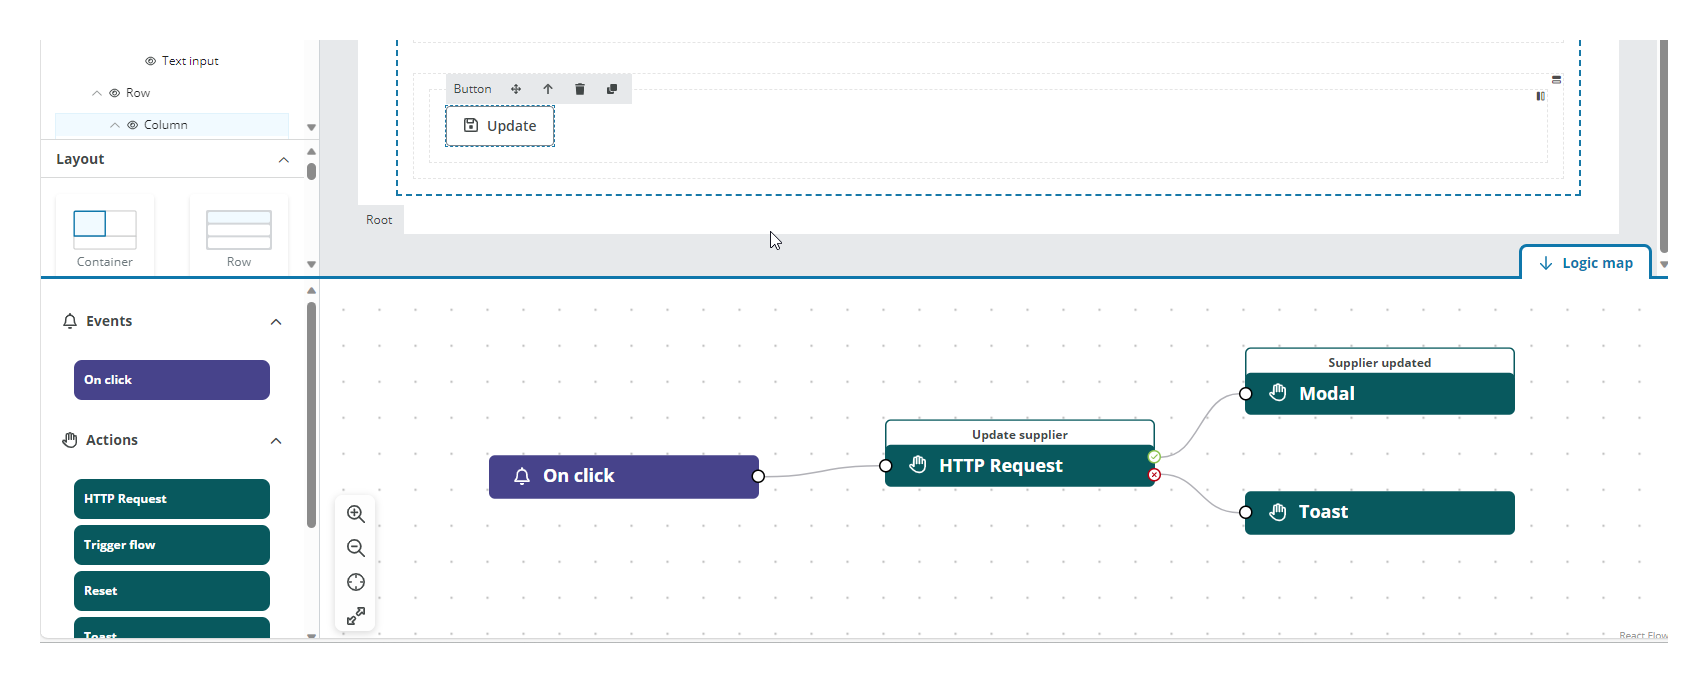
Open the Logic map tab in the bottom-right corner and configure:
- Drag the On click event to the viewport.
- Drag the HTTP request action to the viewport and connect it to the On click event.
- Select HTTP request action in the viewport to see the properties panel to the right.
- Open the HTTP dropdown.
- Select the resource, for this example, Update supplier (res4).
- Drag the Modal action to the viewport and connect it to the HTTP request Green check handle.
- Configure all the required properties for the Modal action. For this example: A one button success type modal.
- Drag the Toast action to the viewport and connect it to de HTTP request Red cross handle.
- Configure all the required properties for the Toast action. For this example: An error type modal.
-
You can see the final result in the following image:
Note: See Components and events and actions for more details.
Finally, after configuring the components and the resources, select the Save draft button and preview you app.